
1970 F100 SWB
Page 1 of 2 • 1, 2 ![]()

1970 F100 SWB
![]() elgemcdlf April 2nd 2012, 9:41 pm
elgemcdlf April 2nd 2012, 9:41 pm

The current list of mods are:
Front Suspension - 2005 Crown Victoria Police Interceptor with 1 1/2" drop springs from Eaton Detroit
Rear Suspension - 1995 MN12 IRS
Engine - 1976 Lincoln 460 (currently stock with plans for a build)
Transmission - 1976 Lincoln C6
Exterior - Peep mirrors, shaved handles, shaved wipers, fender scoops, front plate recess delete, blind mount front bumper, 1953/1954 hood badges, 1967 aluminum grille
Interior - Tilt, power tinted windows
The next major mod is a complete dash swap. Currently smoothing out a dash from a 1957 Fairlane. The cluster will be modified to have 4 gauges instead of 2. The truck dash is welded in & the Fairlane is originally bolted. I plan on bolting the Fairlane dash into the truck so it can be easily removed. Hoping to get wheels and tires this year as well. There may be more mods finished at this time but I can't remember any.

elgemcdlf- Posts : 49
Join date : 2011-11-05

schmitty- Posts : 4538
Join date : 2008-12-02
Age : 53
Location : Holdrege, NE
Re: 1970 F100 SWB
![]() 61coon April 2nd 2012, 10:08 pm
61coon April 2nd 2012, 10:08 pm
Last edited by 61coon on April 2nd 2012, 10:11 pm; edited 1 time in total
61coon- Posts : 1824
Join date : 2009-08-07
Age : 46
Location : Hillsboro,TN
Re: 1970 F100 SWB
![]() 61coon April 2nd 2012, 10:08 pm
61coon April 2nd 2012, 10:08 pm
61coon- Posts : 1824
Join date : 2009-08-07
Age : 46
Location : Hillsboro,TN
Re: 1970 F100 SWB
![]() elgemcdlf April 3rd 2012, 6:28 am
elgemcdlf April 3rd 2012, 6:28 am
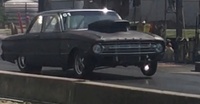
The ride & handling are excellent. I am still relearning how to drive an old truck. I think if I were to drive a stock 1 of this vintage I would end up killing myself. I have pushed it far enough in curves I didn't want any more and it was stuck to the ground like glue. My wife was following me through an S curve one day that had a posted speed limit of 40. I went in at 60 and accelerated all the way through. If I tried that in a stock 1970 F100 I am 100% positive it would have been a serious wreck with all the body roll they have. I have a build thread located in several places on the Net but have decided to go ahead and post it here as well.
Last edited by elgemcdlf on April 3rd 2012, 7:11 am; edited 1 time in total
elgemcdlf- Posts : 49
Join date : 2011-11-05
Re: 1970 F100 SWB
![]() elgemcdlf April 3rd 2012, 6:29 am
elgemcdlf April 3rd 2012, 6:29 am


elgemcdlf- Posts : 49
Join date : 2011-11-05
Re: 1970 F100 SWB
![]() elgemcdlf April 3rd 2012, 6:30 am
elgemcdlf April 3rd 2012, 6:30 am


Here is the '67 grille with the verticals painted black. Kind of gives it a tube grille look.


Before we get started this little 302 is not staying. Hopefully next year she will be sporting a fresh injected 460.
Left side motor mount installed. Difficult to see but the lower portion of the stock mount was cut off and a plate welded to it. Mounted in the CV crossmember original motor mount hole.

Right side without the motor mount installed yet.

elgemcdlf- Posts : 49
Join date : 2011-11-05
Re: 1970 F100 SWB
![]() elgemcdlf April 3rd 2012, 6:31 am
elgemcdlf April 3rd 2012, 6:31 am
I plan on cutting fender scoops in the front fenders, '67 bed, custom (oval) marker lights, putting in a section of cowl grate to eliminate the wipers, adding the "hump" from the hood on the existing hump to form a very subtle cowl induction hood (this part is as bad as chopping a top), dash from a '61-'66 series F100 with a cluster from a '65/'66 custom cab, rolled pan, inside handle for the tailgate, sink the taillights 1", ft bumper from LMC with the built in fog lights (rectangular), the hood badges are leaving in favor of a set from a 1960 F100 (they look like arrows, much "lighter" looking), & last but not least an oval back window with cab rework. Paint will be a blend from black on the bottom up gold on top. On top of that will be a transparent Saphire Blue painted until it gets just the right color. This will create a darker to lighter from bottom to top effect. When that is finished I plan on masking off a set of flames and using more transparent Saphire Blue doing 3 color flames. Something like 6 more coats for the very front then maybe 4 in the midsection and 2 on the tips. Very subtle flames. Wheels are planned as solid reverse types with trim rings and center caps (script letter FORD) painted to match the truck.
I am hoping when it is finished looking at it just sitting one might wonder with exception of suspension work if Ford built some limited production pickup in '70 that has never been heard of. I don't know if I can post information about vendors here so I haven't but for anyone with a 53 and up F series truck I know a guy in NV that runs a salvage yard. Very reasonable prices. Example: I bought both front fenders from him for $40.00 each. Used Ford fenders. He is where I will be getting my '67 bed. $550.00 with good straight tailgate. If memory serves me correct inner fenders for $15.00 each. Core support $125.00.
If it is acceptable to post his contact info here I will so others can benefit.
elgemcdlf- Posts : 49
Join date : 2011-11-05
Re: 1970 F100 SWB
![]() elgemcdlf April 3rd 2012, 6:32 am
elgemcdlf April 3rd 2012, 6:32 am
First thing I did was mark the fenders for the centerline of the existing front hub. The way I did this was to take a straight piece of steel with a level on it and line up on the center of the front hub, rotate until the level was good and mark the fenders. If the doghouse is off marking the frame would work equally as well. Then came tearing out the old suspension. This is the worst part of the job although hand drilling 4 holes 3/4"D on your back under a truck isn't much fun either.
I started by cutting out all the rivets involved until the only piece left was the front crossmember. The crossmember is welded in. I cut it off even with the rails leaving just the very end inside the frame itself. The piece lift is 3 sided and there is an open spot in the upper corners. I cut into 3 pieces (both sides and the top). The sides I beat with a hefty hammer and the welds gave way. The top I delicately sliced the weld with the flaming wrench along the top of the rail maintaining the rail. Used a long prybar to work it free. Drivers side has a boxed section for the steering box that needed cut into a bit. Same process for removing the stub of the crossmember though. A note here on the steering box. I was not able to get my steering box out until the crossmember was cut out. Remember though the engine is still hanging there in the middle of the engine compartment.
Best to make at least the portion of the mount for the rear of the lower control arms that the control arm bolts to before installing the suspension. Gussets can be fabbed later. Ok now we strip everything we don't need from the new suspension. I am not hooking up antilock so out that harness came from each wheel. The brake lines were cut in spots so out they came. I took out the nylon alignment pieces as well (more holes to drill!). Slide the unit under the truck lining up the centerline on the fender with the centerline of the hub using the same process as when making the mark. Check to verify this is where you want it. Might even put a wheel on to make sure this is the placement you desire in your wheel opening. Mark two of your holes on one fo the rails and start drilling. I did the left rail first and placed the holes in the center of the rail. With thhose holes done I ran the bolts down through the bottom of the rail and through the crossmember to help better hold that side in place.
I moved the right side around until it was in the same location as the left, marked my holes and drilled. I started out trying to get the entire unit in correct alignment before drilling and most likely due to equipment and how I was doing this it seemed very difficult. Worked way easier doing it one side at a time. I then ran the crossmember up to the frame with all 4 bolts running down to help align into place. Works pretty well once all 4 holes are drilled. There are upper supports for the strut towers that go over the top of the rail. I put them on and marked my rails for drilling. Drilled those 4 holes. I had the frame section from the CV that housed the spacers so I didn't have to build any. I cut them out of the frame pieces and cut them off to correct length for the inside of the frame rails. This left the nut piece that I placed on top of the rail. You could just as easily drill the upper hole larger to slide them through and weld them in as in the CV.
Now we bolt it up just like in the CV. At this point I went ahead and lined up the sway bar , drilled and bolted in place. Mounting the brake hoses will require either a bracket or spacing away from the rail. If you bolt direct to the rail you will not have enough hose to make full turns.. I mounted in the existing holes from the original brake hose brackets and used spacers on the bolt. Motor mounts. Since I am planning a 460 swap next year I scabbed mine in. Used the original mounts, cut off the bottoms and welded a 1/4" plate to them. Drilled a hole utilizing the CV crossmember as the 3rd point for the motor mount pinning.
Steering hoses. If at all possible get the ends that go in the rack. My front end did not come with them so I went searcing the local junkyards. I merged the old to the new. The other small issue would be the bolt that holds them in.
Have more pics to post. We put in a set of 1 1/2" dropped springs from Eaton Detroit Springs & cut the fenders to add fender scoops. When we did the suspension swap the truck rode very hard up front. With the new springs it rides much better. I even called Eaton Detroit and told them! I would highly recommend the swap to anyone. Most I know say it is way too much work for them. I don't think it was that bad but it was work. All well worth it though. We are now setting our sites to the truck IRS mount kit and getting the rear suspension done.
elgemcdlf- Posts : 49
Join date : 2011-11-05
Re: 1970 F100 SWB
![]() elgemcdlf April 3rd 2012, 6:33 am
elgemcdlf April 3rd 2012, 6:33 am
elgemcdlf- Posts : 49
Join date : 2011-11-05
Re: 1970 F100 SWB
![]() elgemcdlf April 3rd 2012, 6:34 am
elgemcdlf April 3rd 2012, 6:34 am
Oh yes we lost the seal in the left end of the rack so before I even get the rear end in I need to fix the front!


elgemcdlf- Posts : 49
Join date : 2011-11-05
Re: 1970 F100 SWB
![]() elgemcdlf April 3rd 2012, 6:35 am
elgemcdlf April 3rd 2012, 6:35 am


In this pic you can see the holes from the wipers. Later pics those holes disappear.


Another shot that shows the wiper holes in the cowl.

elgemcdlf- Posts : 49
Join date : 2011-11-05


elgemcdlf- Posts : 49
Join date : 2011-11-05
Re: 1970 F100 SWB
![]() elgemcdlf April 3rd 2012, 6:37 am
elgemcdlf April 3rd 2012, 6:37 am
The wiper holes are gone!


Next on the list is the rear suspension with a mount kit from truckirs.com. We are also putting in the dash area from a '65/'66 Custom Cab with instrument cluster. Still have the hood to do. A very subtle cowl induction. Sink the tail lights 1". Contemplating some tailgate treatment. That kinda depends on Dennis Carpenter for the piece I need.
elgemcdlf- Posts : 49
Join date : 2011-11-05
Re: 1970 F100 SWB
![]() elgemcdlf April 3rd 2012, 6:38 am
elgemcdlf April 3rd 2012, 6:38 am
UPDATE:
Mount kit here! Found a used rack for $50.00. Changed my mind on hood badges. Going to use badges from a '54 F100. Need to get the rack installed & then comes the IRS.
elgemcdlf- Posts : 49
Join date : 2011-11-05
Re: 1970 F100 SWB
![]() elgemcdlf April 3rd 2012, 6:39 am
elgemcdlf April 3rd 2012, 6:39 am
elgemcdlf- Posts : 49
Join date : 2011-11-05
elgemcdlf- Posts : 49
Join date : 2011-11-05
Re: 1970 F100 SWB
![]() elgemcdlf April 3rd 2012, 6:42 am
elgemcdlf April 3rd 2012, 6:42 am
elgemcdlf- Posts : 49
Join date : 2011-11-05
Re: 1970 F100 SWB
![]() elgemcdlf April 3rd 2012, 6:42 am
elgemcdlf April 3rd 2012, 6:42 am
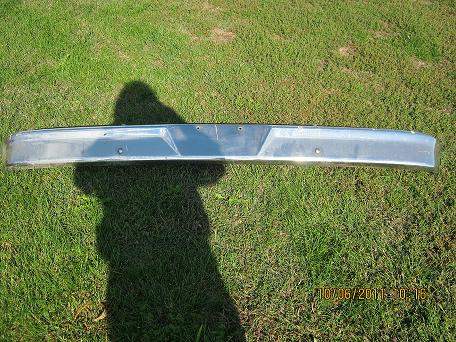


I am hoping to have the bumper back on and a decision on the badges sometime next week. Perhaps Wednesday.
elgemcdlf- Posts : 49
Join date : 2011-11-05
Re: 1970 F100 SWB
![]() elgemcdlf April 3rd 2012, 6:43 am
elgemcdlf April 3rd 2012, 6:43 am

Left side badge replacement.

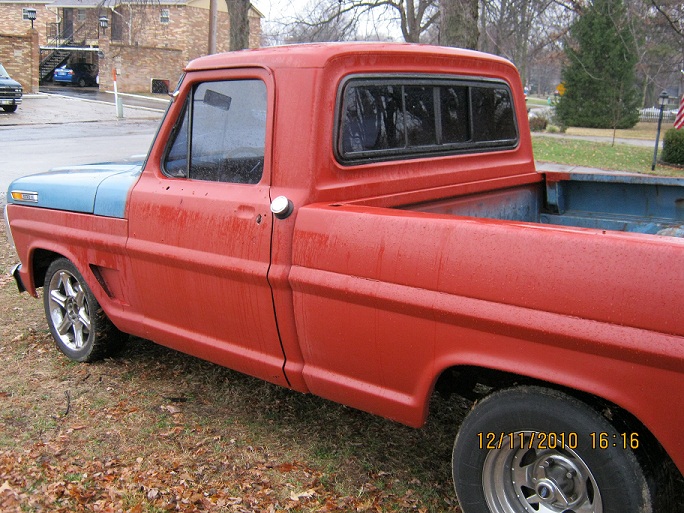
Left side of the truck now.

Right side of the truck now.

Head On view.

The ends of the bumper need pushed back about 3". I will let the chrome shop straighten it out prior to chroming. I still have to order the lights and get all that set up. The appearance of waves in the bumper are an illusion caused by the ground area and chrome side by side.
elgemcdlf- Posts : 49
Join date : 2011-11-05
Re: 1970 F100 SWB
![]() elgemcdlf April 3rd 2012, 6:45 am
elgemcdlf April 3rd 2012, 6:45 am
I have thought about narrowing it. I took a look at the stone guard and it followed the lines pretty well in stock width. I am putting rectangular driving lights in the bumper as well. Kinda thinking following roughly a 60 degree angle from the lights to the mirrors. Using that as a roughing in spot for the lights. I had not thought about clipping the horns and moving in tighter to the body. I am going to look at that. I may still narrow it a bit. Until it goes in for chrome you never know what I might do with it. I do like the look without the plate recess or bolt heads.
The IRS is always getting pushed back. The main problem is I had a bad heart attack back in Jan of this year and they put a defibulator in me. I can not be around welding now so I am at the mercy of others. I only have two guys I know that I trust to do it for me so I wait until one of them can do it. I am still hoping for before winter. Hoping for within 2 weeks. I know I will be one happy camper when it's in. Then comes the 460. Have to pay others to do that as well. Need custom mounts (yep welding) built but hopefully I can sneak that in before spring. After that I think most of the rest that needs done I can do myself.
I am raising the hump in the hood 3/4" for a very subtle cowl induction. Sinking the tail lights 1" along with some other subtle body mods.
I go at it little by little. Checking the "look" before making the next move. Clipping the horns taking the bumper closer to the grille area lends itself to narrowing the bumper. If I covered the body line in the stone guard by moving the bumper back then it would look ok to me if I covered that same body line on the ends by narrowing. The other option would be to custom build the stone guard. If you take a look at yours you will see what I mean. My thoughts are it wouldn't look correct covering that body line on the ends but following it all the way across the front. Clear as mud yet?
The other thing that somewhat bothers me about narrowing it is if you look at the end of the bumper in relation to the headlight doors. It curves tightly around the outside of the doors. I will have to take a close look at it all. '67-'72 bumpers are hard to come by around here. The sectioned in piece is from a '64-'66 truck which happens to be the same bumper with exception of the ends. The '64-'66 just go down straight and the '67-'72 bumper actually follows the upper shape all the way around.
Another issue with the bumper is the radius on top where it turns the corner. I am thinking I need to cut that down to a smaller radius.
I had an appointment to drop the truck off Wednesday for the IRS. As luck would have it we got rain all day. I got all the parts hauled in to the shop though. Had high hopes for Thursday but rain again. I finally got it dropped off this morning. Greg told me he would call early next week. He knows I want to document the install so he will call when he is ready to start on it. If all goes well I will have pics with commentary on the IRS install next week sometime.
On another note my truck was featured in the Readers Rides section of Powerblock Magazine. I went back through this years issues and it is the only vehicle featured this year in primer. For those checking it out you will find it 13 clicks back. It is issue #33.
http://www.powerblocktv.com/magazine/
elgemcdlf- Posts : 49
Join date : 2011-11-05
Re: 1970 F100 SWB
![]() elgemcdlf April 3rd 2012, 6:48 am
elgemcdlf April 3rd 2012, 6:48 am

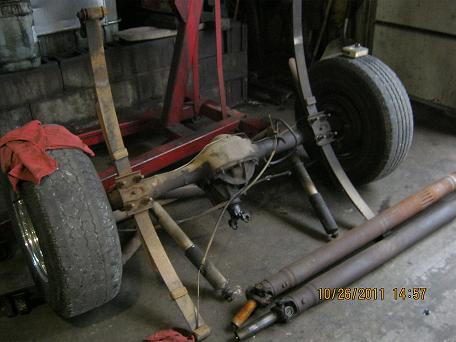
The start of the install is to remove the bed from the truck. Once the bed is removed anything preventing removal of the old rear end or install of the IRS needs to come out. In this case the mufflers were far enough forward so they could stay but the tailpipes had to go. This truck is getting a 460/C6 soon so the exhaust will stay as you see it in the pics until the engine swap. As luck would have it there are really only two U Joints used by Ford unless into a heavier truck. The truck's driveshaft had a small size and the Thunderbird had a large. My local auto parts store was able to find a u joint that would allow putting the TBird end on the truck driveshaft. This is a temporary as when the engine and trans swap takes place a new driveshaft will be built. I am intentionally not posting the u joint number as your driveshafts may have different u joints that need merged. Any good parts store should be able to locate the u joint you need.
I purchased new brake hoses and adapters to convert the 3/6" line over to metric so it could be screwed into the TBird hoses. The adapters are Edelmann 271300. The shocks are not being mounted as in the TBird so shorter shocks are needed. There are plenty of options available. I bought mine at Advance Auto. They are front shocks from a 1970-1982 Chevrolet Blazer. The Advance Part number is 59041. The Monroe part number is 33033. Napa also has Monroe shocks with the part number 94005. If you would prefer something different you are looking for a shock with a compressed length of 10 1/8" & an extended length of 14 5/8". You want eye type mounting on both ends.
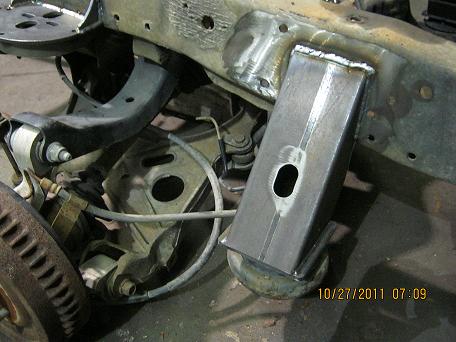
I purchased a mount kit from http://www.truckirs.com. At the time of this entry the kit cost was $395. plus shipping. Ok here we go. Once the rear end and all other required items are removed we measure in 22 5/16" (SWB) 26 5/16" (LWB) from the end of the frame rail on each side and mark the frame. A note on the LWB dimension. This is not a verified number as this install was done one a SWB truck. I do not currently have access to a LWB to check. My recommendation would be to mark the axle centerline on the frame. Align the IRS to this line and utilizing the rear mount mark the frame for the cut. We will be making a cut vertically from this point 1 3/4". Then with the frame level we mark the frame for a horizontal cut forward the length of the rear mounts. So far so good. Now comes the fun part, time to weld the rear mounts in place. After considerable checking for squareness the rear mounts are tacked into place. You will notive the holes for the rear mount are slotted so you have a fair amount of room to shift the carriage around after the mounts are welded in place. In this install the spring perches and upper shock mounts are still on the frame. Just in case we got scared and wanted to put the 9" back in. They will be coming out here shortly. The mount kit comes with 6 gussets, 3 for each side. It also comes with the upper shock mount ears. Here is what the rear mount should look like at this stage.

At this point and visible in the picture the 2x2 piece of .125 wall tubing is weled into place. The length of this piece is 33 11/16" long. It is positioned centered with the mounting bolts & level. Weld to the top of the rear mounts as well as the frame rail. Here are a few pics of the install so far.
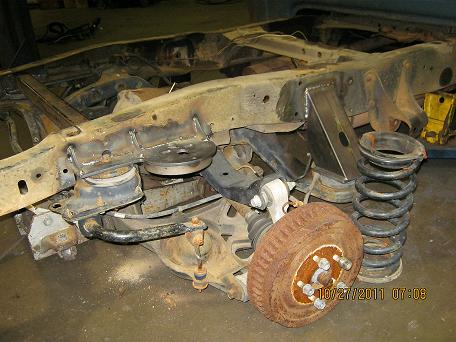
Cutting out the upper shock mount on the passenger side.
The upper shock mount (original) on the passenger side prior to removal.

A shot of the left side from the back of the cab.

A view from above before the 2x2 crossmember was welded in. The line with vice grips on it is the original brake hose.

Passenger side view.

A view from the rear of the driver's side.

One advantage to using the Thunderbird IRS: everything is mounted to the carriage. You have 4 main mounting bolts, 2 brake lines, 2 shocks and the driveshaft. Once they are disconnected the entire unit is out of the truck. HD axle shafts are available for this rear end rated for up to 650hp. Larger diameter sway bars are available aftermarket. Aftermarket drop springs are also available. Being an 8.8 you can get gears in practically any ratio you desire including a locker. I will be cutting coils out of my springs to get the correct ride height. If I have a problem with the springs after cutting I will look into other options. That is it for now. More pics tomorrow as we finish up the install and get the bed back on.
elgemcdlf- Posts : 49
Join date : 2011-11-05
Re: 1970 F100 SWB
![]() elgemcdlf April 3rd 2012, 6:50 am
elgemcdlf April 3rd 2012, 6:50 am
I may swap out for discs later. I planned on swapping the bearings to get a matching bolt pattern. I will have my final answer on discs when I get ready to swap bearings. Getting the engine and trans in are more important to me at this time. The 302 is about dead. The engine will require fab work so I am back to paying a shop to do it for me. Along with that comes a new fabbed radiator and driveshaft. If I did the bearings and swapped to discs right now it would just put me farther away from doing the engine. The wheels I have on the front of the truck came with the IRS. They are drilled for both bolt patterns so I am good for now on that part. I still have fantasies of solid steel reverse type with trim rings and center caps painted to match the truck. They will have to be custom built due to the 12" rotors up front along with offset issues.
elgemcdlf- Posts : 49
Join date : 2011-11-05
Re: 1970 F100 SWB
![]() elgemcdlf April 3rd 2012, 6:50 am
elgemcdlf April 3rd 2012, 6:50 am
Passenger side front mount in place.
Another view of the passenger side front mount.

A view from the rear of the left side front mount.

Another view of the left side front mount.

A closeup of the left front mount.

A closeup of the passenger side front mount.
View from above of the 2x2 in place.

View from above front.

Cutting off the left front spring perch.

Passenger side with both spring perches removed.

Putting the coil springs in. Left side view.

Here is a shot from behind.

elgemcdlf- Posts : 49
Join date : 2011-11-05
Re: 1970 F100 SWB
![]() elgemcdlf April 3rd 2012, 6:51 am
elgemcdlf April 3rd 2012, 6:51 am
Left side from the front.

Right side from the rear.

Right side from the front.

From behind.

elgemcdlf- Posts : 49
Join date : 2011-11-05
Page 1 of 2 • 1, 2 ![]()
» Which Alum Cylinder head?
» ??? on installing 429 in '69 F100
» 63 F100
» My 57' F100 Motor, what ya think?
|
|
|