25.1E ------- 64 Fairlane
+45
nitrous.f
Goldylox_fairlane
Bill Heard
wickettoby1
litshoot
rbro460
Mark Miller
738drvr
774 Super Street
drksyde64
DILLIGASDAVE
jasonf
ssurles268
pmrphil
rmcomprandy
D. Sea
Doug Rahn
514Fox87
Tomasw
Lem Evans
TravisRice
maverick532
Wayne Pearce
slurm
BBFTorino
res0rli9
69F100
AZFairlane
Race Ready Fabrications
larry552
BigBlockFalcon
Scott Foxwell
gmsmkr
7.5L1985GT
Mustang-junky
514F-1
stanger68
whitefield
bruno
cool40
jeffgfg
FalconEh
68formalGT
Mike R
QKiss
49 posters
Page 2 of 13
Page 2 of 13 •  1, 2, 3, ... 11, 12, 13
 Re: 25.1E ------- 64 Fairlane
Thanks for including us in the buildup of this T-Bolt hybrid, the Silver Bullet would have had nothing for this. 

FalconEh- Posts : 1448
Join date : 2014-08-21
Location : on the blacktop or in the mountains ????
 Re: 25.1E ------- 64 Fairlane
FalconEh wrote:Thanks for including us in the buildup of this T-Bolt hybrid, the Silver Bullet would have had nothing for this.

I apologize for the delayed response -- Thanks for your comments FalconEH.
Made a 500 mile round trip to pick up the the 557 for the Fairlane with ported early "A" heads/shaft rockers -- single 1050 gen 3 dominator -- 13.9 compression -- Roller cam -- Danny Bee belt drive.
I then for my day job had to work nights for a week that screwed up the schedule. -------- Qkiss
QKiss- Posts : 155
Join date : 2012-08-05
Location : Nor Cal -- Fortuna behind the Redwood curtian
 Re: 25.1E ------- 64 Fairlane

Mounting engine and trans.

TCI mid plate adapter from BB Ford to GM trans. ------- It is always easier to find a spare GM trans at the track if needed than one with a Ford bell on it at least out west where I live.

Powerglide with the stock GM bell. -- I Know -- I -- Know I don't need to hear about the dude from California with the PINK tail shaft housing. I Didn't paint it !!

Front motor plate and Strut jig for setting up the front frame section and lower "A" arms.

Upper Strut layout tubes and mounts with the Struts held in proper --- camber --- caster --- and straight ahead toe. Also a good time to set up the rack and pinion steering wheel-- column -- shaft combination.
QKiss- Posts : 155
Join date : 2012-08-05
Location : Nor Cal -- Fortuna behind the Redwood curtian
 Re: 25.1E ------- 64 Fairlane

Once the cage perimeter primary tubes that fit the body shape are in place the body can be removed for easy access to Finnish all the secondary tubes.

The string is used to layout door "X" bar location.


Welding access with body off makes it easy to weld completely around the tubes.


QKiss- Posts : 155
Join date : 2012-08-05
Location : Nor Cal -- Fortuna behind the Redwood curtian
 Re: 25.1E ------- 64 Fairlane

A few tips and ideas for notching tubing. The drawing shows the way we notch tubing. The tube is fit to the ID and not the OD of the tube. It leaves a full depth V notch for a good root weld by eliminating the feather edge as shown in the drawing.

A 1 1/2" X .065 tube is being used here to demonstrate the concept. Full OD depth on a 1 1/2" tube would be 1/2 the tube diameter or a 3/4". By fitting to the tube ID and eliminating the feather edge the fish mouth notch with this wall thickness is only 3/8" deep. Above shows the 3/8"depth mark layout on both sides of the tube @ 180 degrees.

A fun idea to get your head around. It is not necessary to have a 1 1/2" round tool to notch a 1 1/2" tube. The tube is being notched on a flat 20" diameter disc sander. The tube is ground to the 3/8' line on one side then flipped 180 degrees using that flat as an index guide to grind to the opposite 3/8"line.

After a radius blend on the disc sander and installed in a vise. The sharp edge is tuned up with a 1/2 round file.

This just shows the file tube relationship. To get the picture it was easier to balance the tube on the file than to balance the file on the tube in the vise.------To not confuse ------ the file work is performed in the vise.

After a few licks with the file we have a perfect tube notch. Once you get your head around this concept there will be more to fallow expanding this idea.
QKiss- Posts : 155
Join date : 2012-08-05
Location : Nor Cal -- Fortuna behind the Redwood curtian
 Re: 25.1E ------- 64 Fairlane
I love it great work and craftsmanship. this build is what inspired me to do the stormtrooper 2.0 build the objective is for it to look like my small tire car but full tube chassis.

gmsmkr- Posts : 1364
Join date : 2014-06-22
Location : alabama
 Re: 25.1E ------- 64 Fairlane

Fitting a 3/4" tube with a 1 1/2" sanding drum. In the above post we fish mouthed a 1 1/2" tube with a flat disc. Keep this concept in mind. So why not fit a 3/4 tube with a 1 1/2" sanding drum?

The way this works is by increasing the attack angle of the tube/drum relationship. The photo shows the concept in action.

Now moving on ------- How about a lazy mans way of figuring tube fitting at an angle.

The notching here is being done on a milling machine with a stout mandrel and hole saw. Set the tube up in the mill vice with the same gap as previously obtained and you have your angle.

The cut being made.

The finished fit.

And one more little tip. When TIG welding a little air relief hole needs to be drilled to relieve the pressure build up due to the heat as the weld is completed to prevent the pressure from blowing out the weld puddle. I like to hide the relief hole in the tube center.The tube in the picture will be moved up to the line for welding.
QKiss- Posts : 155
Join date : 2012-08-05
Location : Nor Cal -- Fortuna behind the Redwood curtian
 Re: 25.1E ------- 64 Fairlane

Rear suspension ------ 4 Link --- Anti Roll bar --- Centering link "X" and in place of the rear coil overs behind the housing are set up struts to hold and establish ride height.

Center link "X" and how it adjusts.

The primary link the one piece tube that passes through the secondary link. The secondary link is made up of two tubes with a center tunnel tube jigged for welding with an angle iron fixture to hold every thing in alignment tack welding.

Aluminum set up sleeve made up on the lathe to center the tunnel tube and primary tube.


Delrin split bushing to take place of the aluminum set up bushing.

Zip tie is used to hold bushing in place nesting in groove cut in bushing.

The primary tube has left and right thread rod ends on each end of the tube and by loosening the jam nuts the tube can be turned to lengthen or shorten the tube to adjust rear housing position. The secondary tube has the primary tube going through its center so it can not be turned like the primary tube so this photo shows the left and right hand thread turn buckle that accomplishes the same thing made from hex stock.
QKiss- Posts : 155
Join date : 2012-08-05
Location : Nor Cal -- Fortuna behind the Redwood curtian
 Re: 25.1E ------- 64 Fairlane

Mid plate / Adapter Plate. Frame tab on the lower right is a plate mount and also support to check starter flex.

Rear trans mount plate style.


Motor limiter assemble ---- One on each side. --------- Motor plates / Mid plates have good strength side to side but no support for and aft. Motor limiters supply the much needed for and aft strength.

QKiss- Posts : 155
Join date : 2012-08-05
Location : Nor Cal -- Fortuna behind the Redwood curtian
 Re: 25.1E ------- 64 Fairlane
Excellent! Keep going!
Scott Foxwell- Posts : 419
Join date : 2011-06-23
Age : 65
Location : E Tennessee
 Re: 25.1E ------- 64 Fairlane
I looked through all your pics on Photobucket. Do you want to do a 68 Falcon also. Really really nice car.
 Re: 25.1E ------- 64 Fairlane
Thanks guys for the kind words. ----- I do have a soft spot for 64 Falcons. I have toyed with the idea of a pro street Falcon --- Narrowed 9" ----- 4 Link ----- tubs ----- Mustang II front end ----- 460 ----- Top loader as a street cruiser. -------- Qkiss
QKiss- Posts : 155
Join date : 2012-08-05
Location : Nor Cal -- Fortuna behind the Redwood curtian
 Re: 25.1E ------- 64 Fairlane

Adjustable pedal assemble with bell crank and master cylinder 90 degrees to pedal throw and cable throttle. Small pedal on the left is a foot rest to protect M/C.

Mounting brackets on each end with a series of holes for adjustability.


Close up of bell crank assemble and turn buckles with left and right threaded rod ends for length adjustment.


AN-3 bulk head fittings going through the floor to s.s. brake lines.

Floor in with braided steel flex lines from M/C to bulkhead fittings.

Finished and back from the chrome shop.
This is the first time I have built a pedal assemble like this so testing at the calipers with a pressure gauge is a must before being put into service.
QKiss- Posts : 155
Join date : 2012-08-05
Location : Nor Cal -- Fortuna behind the Redwood curtian
 Re: 25.1E ------- 64 Fairlane

Mounting seat with small 4130 tube frame and Dzus buttons.


Seat tubing frame work.

Small tube spud and chassis tab seat frame mount.

Small weld clevis and chassis tab seat mount.

Dzus button and tab mounting. Tabs welded to cage and seat frame work.

QKiss- Posts : 155
Join date : 2012-08-05
Location : Nor Cal -- Fortuna behind the Redwood curtian
 Re: 25.1E ------- 64 Fairlane

Steering wheel -- Quick release hub -- Apex U-joint -- steering shaft.

Steering wheel center hub with center hole indicator.

With wheel properly installed and locked in place an indicator button fills the center hole flush.

The cross bolt is a drilled AN aircraft bolt that is selected for grip length so there is no threads in the hole and the hole is drilled and reamed for good fit and safety wired. AN flat washers come in 1/32 and 1/16 thickness for nut/thread shimming.

Finished
QKiss- Posts : 155
Join date : 2012-08-05
Location : Nor Cal -- Fortuna behind the Redwood curtian
 Re: 25.1E ------- 64 Fairlane
very nice build

larry552- Posts : 335
Join date : 2012-12-10
Age : 42
Location : Albany Ga
 Re: 25.1E ------- 64 Fairlane
Absolutely beautiful!!

Race Ready Fabrications- Posts : 619
Join date : 2010-04-19
Age : 43
Location : Chandler, IN
 Re: 25.1E ------- 64 Fairlane

cool40- BBF CONTRIBUTOR

- Posts : 7308
Join date : 2009-08-31
Age : 53
Location : on the 1/8 mile dyno
 Re: 25.1E ------- 64 Fairlane
Thanks for the at-a boys guys.
Cool 40 --- That is a very good point about binding with articulation. It has been awhile since the X bar build but I don't remember considering articulation bind. It is some thing to keep in mind though. I believe as a race only set up it will be OK. If it were a street car set up with no anti roll bar it could very well be a problem going in and out of drive ways at an angle for example. IMHO I do not believe Ladder bar cars gain any benefit from a arb. I have seen in the drive way example a ladder bar pro street car not articulate at all and pick a rear tire clear off the ground. In this same type application I have seen the housing brackets tear a big chunk out of the axle tubes.
  Oops got off on a rant.
Back to the point -- I have no idea how much articulation this set up will tolerate before binding but I am fairly certain its OK.

The anti roll bar is 1 1/4" diameter X 20" long

The arms a splined and clamped -- No movement here.

With this set up articulation will be minimal if any at all. ------ But you know what they say about your BRILLIANT idea. If you try it and it does not work. Guess what ------ Scrap it ---- Its time for a new idea.

Cool 40 --- That is a very good point about binding with articulation. It has been awhile since the X bar build but I don't remember considering articulation bind.
Back to the point -- I have no idea how much articulation this set up will tolerate before binding but I am fairly certain its OK.

The anti roll bar is 1 1/4" diameter X 20" long

The arms a splined and clamped -- No movement here.

With this set up articulation will be minimal if any at all. ------ But you know what they say about your BRILLIANT idea. If you try it and it does not work. Guess what ------ Scrap it ---- Its time for a new idea.
QKiss- Posts : 155
Join date : 2012-08-05
Location : Nor Cal -- Fortuna behind the Redwood curtian
 Re: 25.1E ------- 64 Fairlane

Battery box made of small diameter 4130 tubing and 22 gauge sheet metal floor for the 16 volt battery.

4130 tube hold down.


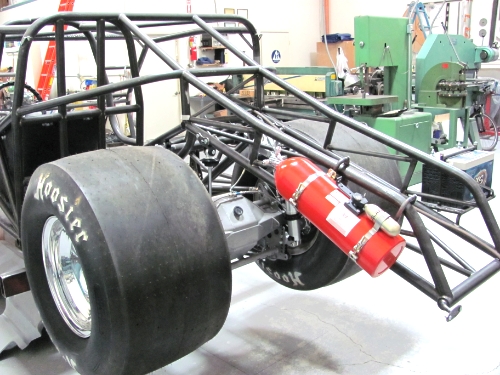
Fire bottle mount.

Top bottle mount frame work and chassis tabs.
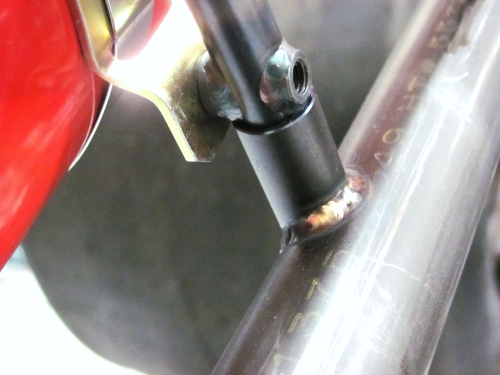
Bottom bottle mount frame work slipped into receiver tubes welded to the frame. This set up requires only the two top bolts to secure and makes for easy removal.

Last edited by QKiss on September 22nd 2016, 8:49 am; edited 1 time in total (Reason for editing : add photo)
QKiss- Posts : 155
Join date : 2012-08-05
Location : Nor Cal -- Fortuna behind the Redwood curtian
 Re: 25.1E ------- 64 Fairlane
Drive shaft tube/loops with removable top.

2 piece drive shaft loops and chassis clevises with tabs.

Drive shaft loops.

Chassis tabs and clevises for removable drive shaft tube.

Lower half of the removable drive shaft tube.

Top half of the drive shaft tube.

Lower half of the drive shaft tube with the aluminum drive shaft installed.
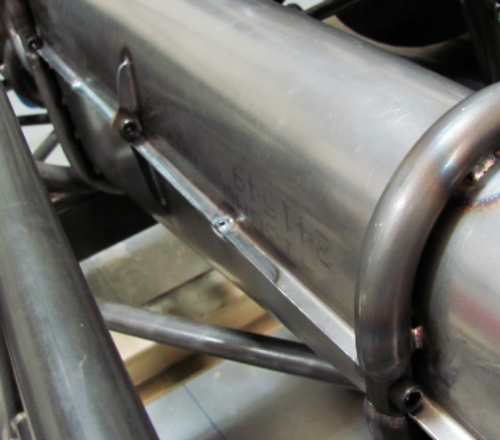
Drive shaft tube bolted together.

This view is looking up the drive shaft tube from the rear end.


2 piece drive shaft loops and chassis clevises with tabs.

Drive shaft loops.

Chassis tabs and clevises for removable drive shaft tube.

Lower half of the removable drive shaft tube.

Top half of the drive shaft tube.

Lower half of the drive shaft tube with the aluminum drive shaft installed.

Drive shaft tube bolted together.

This view is looking up the drive shaft tube from the rear end.
QKiss- Posts : 155
Join date : 2012-08-05
Location : Nor Cal -- Fortuna behind the Redwood curtian
 Re: 25.1E ------- 64 Fairlane
No matter how many times I see your work, I am always amazed. Good job Sir.
AZFairlane- BBF CONTRIBUTOR

- Posts : 573
Join date : 2009-02-02
Age : 71
Location : Glendale, AZ
 Re: 25.1E ------- 64 Fairlane
AZFairlane wrote:No matter how many times I see your work, I am always amazed. Good job Sir.
X2
69F100- BBF CONTRIBUTOR

- Posts : 5384
Join date : 2009-01-04
Age : 57
Location : Irwinville Ga.
 Re: 25.1E ------- 64 Fairlane
Thanks guys your comments are appreciated. 


QKiss- Posts : 155
Join date : 2012-08-05
Location : Nor Cal -- Fortuna behind the Redwood curtian
 Re: 25.1E ------- 64 Fairlane
X3!  it don't get any nicer than this! The cool factor is just a bonus!

cool40- BBF CONTRIBUTOR

- Posts : 7308
Join date : 2009-08-31
Age : 53
Location : on the 1/8 mile dyno
Page 2 of 13 •  1, 2, 3, ... 11, 12, 13
 Similar topics
» 64 Fairlane Strut Front Suspension Conversion Its Done! JIT for the bash!
» Looking for 64 Fairlane
» 1967 fairlane wagon tire ?
» 460 crate engine
» What Are 289 Hipo Heads Worth
» Looking for 64 Fairlane
» 1967 fairlane wagon tire ?
» 460 crate engine
» What Are 289 Hipo Heads Worth
Page 2 of 13
Permissions in this forum:
You cannot reply to topics in this forum|
|
|
