
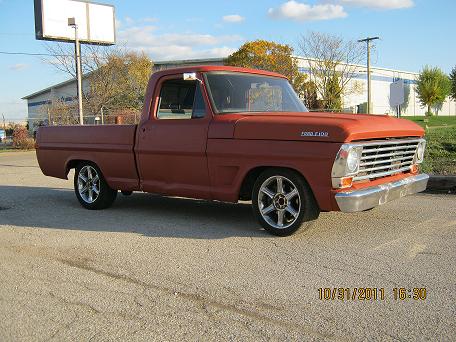
1970 F100 SWB
Page 1 of 2 • 1, 2 ![]()

Re: 1970 F100 SWB
![]() elgemcdlf April 3rd 2012, 6:39 am
elgemcdlf April 3rd 2012, 6:39 am

elgemcdlf- Posts : 49
Join date : 2011-11-05
elgemcdlf- Posts : 49
Join date : 2011-11-05
Re: 1970 F100 SWB
![]() elgemcdlf April 3rd 2012, 6:42 am
elgemcdlf April 3rd 2012, 6:42 am
elgemcdlf- Posts : 49
Join date : 2011-11-05
Re: 1970 F100 SWB
![]() elgemcdlf April 3rd 2012, 6:42 am
elgemcdlf April 3rd 2012, 6:42 am


I am hoping to have the bumper back on and a decision on the badges sometime next week. Perhaps Wednesday.
elgemcdlf- Posts : 49
Join date : 2011-11-05
Re: 1970 F100 SWB
![]() elgemcdlf April 3rd 2012, 6:43 am
elgemcdlf April 3rd 2012, 6:43 am

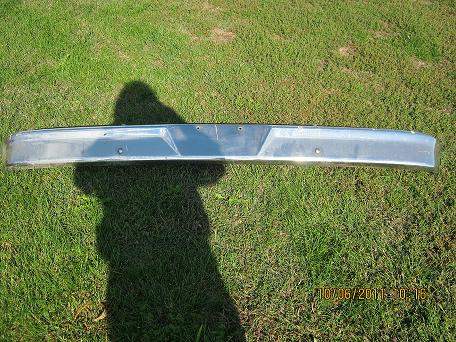
Left side badge replacement.

Left side of the truck now.

Right side of the truck now.

Head On view.

The ends of the bumper need pushed back about 3". I will let the chrome shop straighten it out prior to chroming. I still have to order the lights and get all that set up. The appearance of waves in the bumper are an illusion caused by the ground area and chrome side by side.
elgemcdlf- Posts : 49
Join date : 2011-11-05
Re: 1970 F100 SWB
![]() elgemcdlf April 3rd 2012, 6:45 am
elgemcdlf April 3rd 2012, 6:45 am
I have thought about narrowing it. I took a look at the stone guard and it followed the lines pretty well in stock width. I am putting rectangular driving lights in the bumper as well. Kinda thinking following roughly a 60 degree angle from the lights to the mirrors. Using that as a roughing in spot for the lights. I had not thought about clipping the horns and moving in tighter to the body. I am going to look at that. I may still narrow it a bit. Until it goes in for chrome you never know what I might do with it. I do like the look without the plate recess or bolt heads.
The IRS is always getting pushed back. The main problem is I had a bad heart attack back in Jan of this year and they put a defibulator in me. I can not be around welding now so I am at the mercy of others. I only have two guys I know that I trust to do it for me so I wait until one of them can do it. I am still hoping for before winter. Hoping for within 2 weeks. I know I will be one happy camper when it's in. Then comes the 460. Have to pay others to do that as well. Need custom mounts (yep welding) built but hopefully I can sneak that in before spring. After that I think most of the rest that needs done I can do myself.
I am raising the hump in the hood 3/4" for a very subtle cowl induction. Sinking the tail lights 1" along with some other subtle body mods.
I go at it little by little. Checking the "look" before making the next move. Clipping the horns taking the bumper closer to the grille area lends itself to narrowing the bumper. If I covered the body line in the stone guard by moving the bumper back then it would look ok to me if I covered that same body line on the ends by narrowing. The other option would be to custom build the stone guard. If you take a look at yours you will see what I mean. My thoughts are it wouldn't look correct covering that body line on the ends but following it all the way across the front. Clear as mud yet?
The other thing that somewhat bothers me about narrowing it is if you look at the end of the bumper in relation to the headlight doors. It curves tightly around the outside of the doors. I will have to take a close look at it all. '67-'72 bumpers are hard to come by around here. The sectioned in piece is from a '64-'66 truck which happens to be the same bumper with exception of the ends. The '64-'66 just go down straight and the '67-'72 bumper actually follows the upper shape all the way around.
Another issue with the bumper is the radius on top where it turns the corner. I am thinking I need to cut that down to a smaller radius.
I had an appointment to drop the truck off Wednesday for the IRS. As luck would have it we got rain all day. I got all the parts hauled in to the shop though. Had high hopes for Thursday but rain again. I finally got it dropped off this morning. Greg told me he would call early next week. He knows I want to document the install so he will call when he is ready to start on it. If all goes well I will have pics with commentary on the IRS install next week sometime.
On another note my truck was featured in the Readers Rides section of Powerblock Magazine. I went back through this years issues and it is the only vehicle featured this year in primer. For those checking it out you will find it 13 clicks back. It is issue #33.
http://www.powerblocktv.com/magazine/
elgemcdlf- Posts : 49
Join date : 2011-11-05
Re: 1970 F100 SWB
![]() elgemcdlf April 3rd 2012, 6:48 am
elgemcdlf April 3rd 2012, 6:48 am

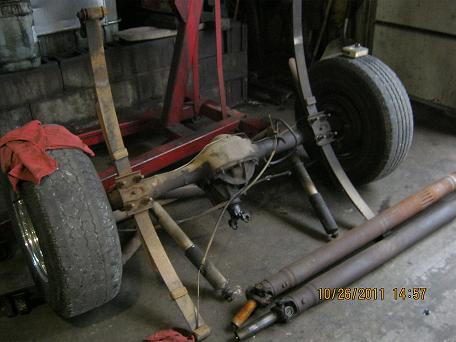
The start of the install is to remove the bed from the truck. Once the bed is removed anything preventing removal of the old rear end or install of the IRS needs to come out. In this case the mufflers were far enough forward so they could stay but the tailpipes had to go. This truck is getting a 460/C6 soon so the exhaust will stay as you see it in the pics until the engine swap. As luck would have it there are really only two U Joints used by Ford unless into a heavier truck. The truck's driveshaft had a small size and the Thunderbird had a large. My local auto parts store was able to find a u joint that would allow putting the TBird end on the truck driveshaft. This is a temporary as when the engine and trans swap takes place a new driveshaft will be built. I am intentionally not posting the u joint number as your driveshafts may have different u joints that need merged. Any good parts store should be able to locate the u joint you need.
I purchased new brake hoses and adapters to convert the 3/6" line over to metric so it could be screwed into the TBird hoses. The adapters are Edelmann 271300. The shocks are not being mounted as in the TBird so shorter shocks are needed. There are plenty of options available. I bought mine at Advance Auto. They are front shocks from a 1970-1982 Chevrolet Blazer. The Advance Part number is 59041. The Monroe part number is 33033. Napa also has Monroe shocks with the part number 94005. If you would prefer something different you are looking for a shock with a compressed length of 10 1/8" & an extended length of 14 5/8". You want eye type mounting on both ends.
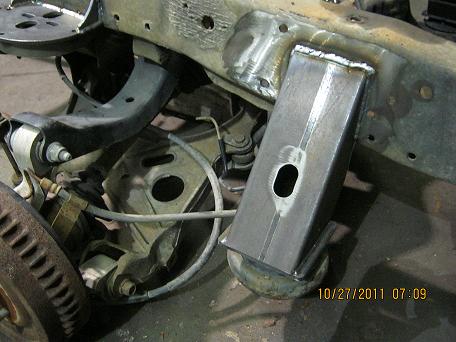
I purchased a mount kit from http://www.truckirs.com. At the time of this entry the kit cost was $395. plus shipping. Ok here we go. Once the rear end and all other required items are removed we measure in 22 5/16" (SWB) 26 5/16" (LWB) from the end of the frame rail on each side and mark the frame. A note on the LWB dimension. This is not a verified number as this install was done one a SWB truck. I do not currently have access to a LWB to check. My recommendation would be to mark the axle centerline on the frame. Align the IRS to this line and utilizing the rear mount mark the frame for the cut. We will be making a cut vertically from this point 1 3/4". Then with the frame level we mark the frame for a horizontal cut forward the length of the rear mounts. So far so good. Now comes the fun part, time to weld the rear mounts in place. After considerable checking for squareness the rear mounts are tacked into place. You will notive the holes for the rear mount are slotted so you have a fair amount of room to shift the carriage around after the mounts are welded in place. In this install the spring perches and upper shock mounts are still on the frame. Just in case we got scared and wanted to put the 9" back in. They will be coming out here shortly. The mount kit comes with 6 gussets, 3 for each side. It also comes with the upper shock mount ears. Here is what the rear mount should look like at this stage.

At this point and visible in the picture the 2x2 piece of .125 wall tubing is weled into place. The length of this piece is 33 11/16" long. It is positioned centered with the mounting bolts & level. Weld to the top of the rear mounts as well as the frame rail. Here are a few pics of the install so far.
Cutting out the upper shock mount on the passenger side.
The upper shock mount (original) on the passenger side prior to removal.

A shot of the left side from the back of the cab.

A view from above before the 2x2 crossmember was welded in. The line with vice grips on it is the original brake hose.

Passenger side view.

A view from the rear of the driver's side.

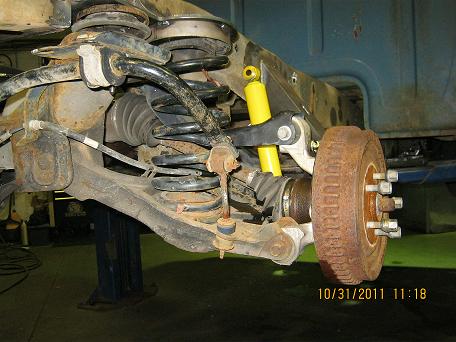
One advantage to using the Thunderbird IRS: everything is mounted to the carriage. You have 4 main mounting bolts, 2 brake lines, 2 shocks and the driveshaft. Once they are disconnected the entire unit is out of the truck. HD axle shafts are available for this rear end rated for up to 650hp. Larger diameter sway bars are available aftermarket. Aftermarket drop springs are also available. Being an 8.8 you can get gears in practically any ratio you desire including a locker. I will be cutting coils out of my springs to get the correct ride height. If I have a problem with the springs after cutting I will look into other options. That is it for now. More pics tomorrow as we finish up the install and get the bed back on.
elgemcdlf- Posts : 49
Join date : 2011-11-05
Re: 1970 F100 SWB
![]() elgemcdlf April 3rd 2012, 6:50 am
elgemcdlf April 3rd 2012, 6:50 am
I may swap out for discs later. I planned on swapping the bearings to get a matching bolt pattern. I will have my final answer on discs when I get ready to swap bearings. Getting the engine and trans in are more important to me at this time. The 302 is about dead. The engine will require fab work so I am back to paying a shop to do it for me. Along with that comes a new fabbed radiator and driveshaft. If I did the bearings and swapped to discs right now it would just put me farther away from doing the engine. The wheels I have on the front of the truck came with the IRS. They are drilled for both bolt patterns so I am good for now on that part. I still have fantasies of solid steel reverse type with trim rings and center caps painted to match the truck. They will have to be custom built due to the 12" rotors up front along with offset issues.
elgemcdlf- Posts : 49
Join date : 2011-11-05
Re: 1970 F100 SWB
![]() elgemcdlf April 3rd 2012, 6:50 am
elgemcdlf April 3rd 2012, 6:50 am
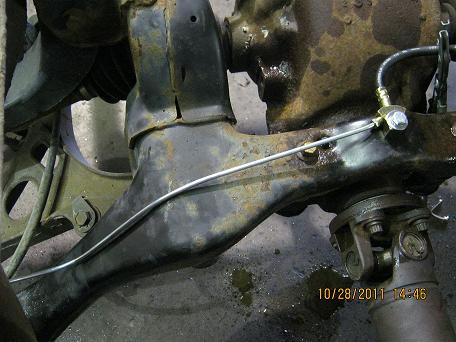
Passenger side front mount in place.
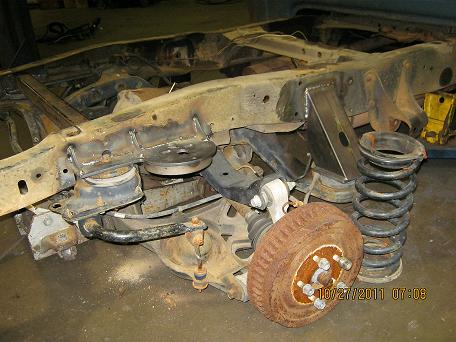
Another view of the passenger side front mount.

A view from the rear of the left side front mount.

Another view of the left side front mount.

A closeup of the left front mount.

A closeup of the passenger side front mount.
View from above of the 2x2 in place.

View from above front.

Cutting off the left front spring perch.

Passenger side with both spring perches removed.

Putting the coil springs in. Left side view.

Here is a shot from behind.

elgemcdlf- Posts : 49
Join date : 2011-11-05
Re: 1970 F100 SWB
![]() elgemcdlf April 3rd 2012, 6:51 am
elgemcdlf April 3rd 2012, 6:51 am
Left side from the front.

Right side from the rear.

Right side from the front.

From behind.

elgemcdlf- Posts : 49
Join date : 2011-11-05
Re: 1970 F100 SWB
![]() elgemcdlf April 3rd 2012, 6:51 am
elgemcdlf April 3rd 2012, 6:51 am
At the end of the IRS install portion of my build thread I will be posting some information concerning locating the location of the cut into the frame. The dimension I used above is the same dimension on the http://www.truckirs.com website. It is perfect for Ford SWB pickups. If you have something else that dimension will not work. I have found a better way to locate the cut. I have also been communicating with Dave at http://www.truckirs.com via email and together we are attempting to alter the install instructions so that they will work for anyone wanting to do this type of install.
Ok enough of that off to more pics! First we have the driveshaft installed. It uses that blend u joint spoke of above. I was somewhat concerned about length differences but it looks as though the 9" and the 8.8 are the same or at least very close to the same length from the center of the axle to the front of the third member. I have seen pics of putting the 9" yoke on the front of the 8.8. I do not like this as the 8.8 has a plate on the front the driveshaft bolts to. Since I will be having a driveshaft built in the future I wanted the TBird rear left as a TBird. When finished it will take a u joint for a 1995 TBird. Nothing special or difficult to find. So this install can be done without altering your current driveshaft if that be your desire. Just have a real parts guy find you the correct u joint.

Now we have some pics of getting the brake lines ran. The original hose was replaced although it did not need to be. A T could have been put in line at the point of the old hose and solid lines ran to the new hoses for each wheel. I bought new hoses for each wheel and it was determined the best mounting point was on the front mount. The plan is finishing her up Monday if time permits. Oh just for the die hard Ford people out there while I was at Moonlight yesterday taking pics a guy walked in and asked me if I was the owner. Cutting the story short he absolutely loves the swap. Then he went on to tell me he had a lowered truck. I asked and he said an 86 Chevrolet. I asked how he lowered it and he said springs and shackle kit. "Rides like crap and bottoms out on the bump stops out back". I thought it kinda cool a Chevrolet person was doing a thumbs up to a Ford truck!

The new upper hose is mounted to an existing hole in the carriage that we tapped to accept a 5/16" bolt.

Now just some pics of the lines installed.

All that is left is bleeding the brakes out! I am hoping to get some pics of the shock mounts before the bed is on. They had not been welded on at the time of these pics and Greg was hoping to have the bed set on the frame tonight. If so no pics of the shock mounts. I will post pics from the http://www.truckirs.com website showing location of the upper shock mounts.
elgemcdlf- Posts : 49
Join date : 2011-11-05
Re: 1970 F100 SWB
![]() elgemcdlf April 3rd 2012, 6:52 am
elgemcdlf April 3rd 2012, 6:52 am
The front mounts are slotted side to side. This allows for moving the front of the carriage to the left or right. If you are close but dog tracking a bit this adjustment will solve that problem.
The truck is on the ground and for the most part finished. The left bearing is bad and caused the tire to rub. Had to leave it and have the bearing replaced. Couldn't drive it very far at all the way it is. I did get to take it for a short run and it rides excellent!
The passenger shock getting lined up for the upper mounts to be put in. From the front view.

Same side from the rear view.
From the rear.

I did not make it back to get picks of the shocks installed before the bed went on but do have a couple pics of the upper mounts. Passenger side.

Drivers side.

Bed on, from the rear, still on the hoist.


Under the truck, left side, from the front.

Under the truck, right side, from the front.

Outside. Not the best pics but I will take more tomorrow.

elgemcdlf- Posts : 49
Join date : 2011-11-05
Re: 1970 F100 SWB
![]() elgemcdlf April 3rd 2012, 6:54 am
elgemcdlf April 3rd 2012, 6:54 am


elgemcdlf- Posts : 49
Join date : 2011-11-05
Re: 1970 F100 SWB
![]() elgemcdlf April 3rd 2012, 6:54 am
elgemcdlf April 3rd 2012, 6:54 am


elgemcdlf- Posts : 49
Join date : 2011-11-05
Re: 1970 F100 SWB
![]() elgemcdlf April 3rd 2012, 6:56 am
elgemcdlf April 3rd 2012, 6:56 am
I don't go by track width as it is measured from the center of the tread to the center of the tread. Offset and wheel width can alter that dimension. The hub to hub on the IRS is 63 1/4". I am wanting wheels with the smallest D. I can get. If I can get 16" wheels that will clear the brakes in the style I want they will be 16's. If not I will move into 17's. I have not found anyone that offers the style I want larger than 17. Tires will be dependant on the wheels. I will be going for street rod big and little look. By going with the smallest D I am hoping to look older.
http://www.wheelvintiques.com/index.php/products/ Page 9 is the style I am looking for. Don't have to be exactly that wheel but similiar. The rears will be as wide as I can get under the tail inside the wheel wells. Fronts I want wide but narrower than the rear. Clear as mud yet?
http://www.thewheelsmith.net/CustomWheels/SmoothieWheelsAccessories.html Here are some more of similiar style.
WheelSmith has a good display of what dimensions they need to be able to either build or not build wheels. They go up to 16". Wheels Vintique go up to 17" but they get proud of them over 16's. Almost $300 per wheel not including the hub cap and trim ring. The hub to hub of the CV IFS is wider than the MN12 IRS. Now with a full set of the same wheels the rear looks narrower than the front (it is). I also want the wheels to be at least even on the outside side front to rear. If not the front needs to be farther inside the fender than the rear. I will be answering all the wheel builders questions and let them tell me what I want. They are the wheel experts, hopefully I will get exactly what I want that way.
Gotta be sure as with custom built wheels they are mine right or wrong if they are built to spec.
elgemcdlf- Posts : 49
Join date : 2011-11-05
Re: 1970 F100 SWB
![]() elgemcdlf April 3rd 2012, 6:57 am
elgemcdlf April 3rd 2012, 6:57 am


460 mounts for my truck.
elgemcdlf- Posts : 49
Join date : 2011-11-05
Re: 1970 F100 SWB
![]() elgemcdlf April 3rd 2012, 6:58 am
elgemcdlf April 3rd 2012, 6:58 am

My wife and a friend of ours Brandy.

elgemcdlf- Posts : 49
Join date : 2011-11-05
Re: 1970 F100 SWB
![]() elgemcdlf April 3rd 2012, 7:02 am
elgemcdlf April 3rd 2012, 7:02 am
The "problem" to me is I like the old deep dish look. The only way to get that back is to narrow the hub to hub dimension. Not an easy task without major modifications. I am going with solid steel wheels, old street rod style. I have been tempted by truspoke style wheels though. Chrome rim, spokes painted to match the body. The only issue I have with the 16's is can I actually get 16's in the style I want for the front. If not I will have to move up to 17's and they get expensive then. The rear is narrower so I will be able to have the deep dish look back there with no problem.
A response to going lower with the truck.
I would like it lower but not slammed. I do not like that look at all. I have very little invested in the suspension when you compare to other options. I have full suspension travel. I too have thought about kicking up the section of frame the crossmember is mounted to. I don't think I would do much more than a couple inches that way though. Still want to be able to steer. It's funny, friends of mine around here with pickups think it sits so low. I tell them "It must just be me. Maybe I am so used to looking at it I don't think it sits low." I get funny looks to that one. My original thoughts were a MII type IFS with a Jag XKE rear. After doing some homework I found the two swaps I did which gave me what I wanted for quite a bit less money.
If you do notch remember the rear mount for the lower control arm lines up right under the rail right where the cab mount is. It will be a wee bit more than just notching where it mounts with the main bolts. You might be able to spin the mount bolting it in horizontally (more like the CV) instead of vertically but you still have that cab mount to deal with. I am thinking a clip or using the complete CV frame (wheelbase is 1/4" difference) might be a better choice.
Whenever I get to thinking lower I just remember how much I have invested in relation to what I have. Don't use the MII suspension under your truck. You need to buy one designed for a pickup. Same basic design just heavier to deal with the extra weight. I also am not a fan of the little brakes on the MII suspensions. I think if I were going to do MII I would probably just build it all from scratch utilizing perhaps the CV spindles which would give 12" rotors. Other issues I have to watch is I do not want to alter the floors for suspension. I will modify the firewall/floor for the 460/C6 if need be. I really do not like the look in the beds of the slammed pickups. I think it should look like a pickup when you are finished with it. IMHO it doesn't look like a truck with a huge hump in the bed floor.
elgemcdlf- Posts : 49
Join date : 2011-11-05
Re: 1970 F100 SWB
![]() elgemcdlf April 3rd 2012, 7:02 am
elgemcdlf April 3rd 2012, 7:02 am
Using this cluster

This is from a '57 Fairlane. What do you guys think? A bump with this dash. Now the dash will be shaved. Glovebox door welded shut along with the ashtray. No radio or anything else you see in the pic. The dash will have the ignition switch, headlight switch, hazard light switch and heat/ac controls. I plan on building a very thin slit all along the bottom of the dash that will be the output for the ac. Something else about this dash it has long slim defroster vents instead of the small square ones in the bump dash.
elgemcdlf- Posts : 49
Join date : 2011-11-05
Re: 1970 F100 SWB
![]() elgemcdlf April 3rd 2012, 7:03 am
elgemcdlf April 3rd 2012, 7:03 am
The windshield on the '57 wraps around & the dash matches that shape. I plan on taking the "wings" of the dash and cutting them off at the door opening. Then welding the ends I cut off onto the door thus continuing the dash into the door. Making sense yet? Well at least that's how I see it in my head.
Well I got word on the modification of the cluster. They said $3200-$3600 depending on the condition of the cluster I send them. That will definitely have to wait. It will go in with the 2 idiot lights for now. I may round up a couple extra clusters and try my hand at the modification.
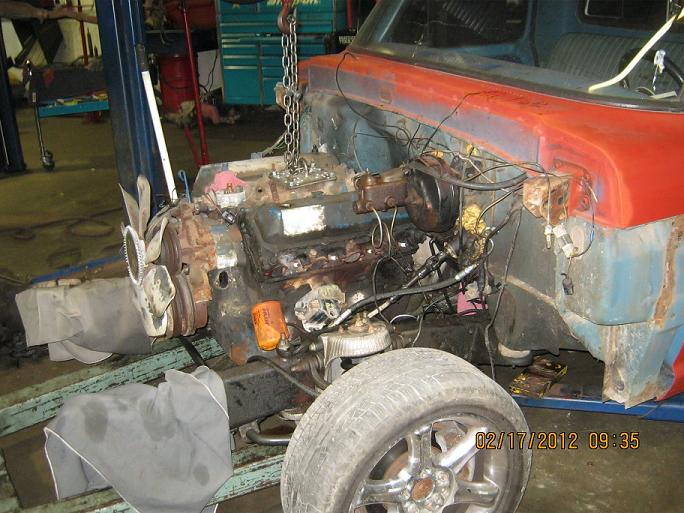
I am spending the first week in Feb in southern MO. Dropped the truck off today for the heart transplant. Will be soon and she will be sporting a 460 & C6 instead of a tired 302 & C4. Headers surprised me. $207 from a local dealer. Best I could find online was $199 + shipping. I am curious to see if it drops the nose any.
Picked up my '57 Fairlane dash yesterday just south of Montgomery, AL. Will be getting some pics up soon. The Fairlane is a bolt in the car. I plan on cutting my dash across the base of the windshield & putting in mounting tabs so the replacement dash will be a bolt in as in the car. Make working on things behind the dash much easier.
elgemcdlf- Posts : 49
Join date : 2011-11-05
Re: 1970 F100 SWB
![]() elgemcdlf April 3rd 2012, 7:06 am
elgemcdlf April 3rd 2012, 7:06 am

This is the plan for this area. The 2 idiot lights changed over to green and utilized as turn signal indicators. The PRNDL changed out for a correct display for the C6. The 2 switch wells painted to match the dash in the current blue areas. The left side will house from left to right ignition switch, headlight switch, emergency flashers. The right side will house HVAC controls. That is all the switches that will be in the dash. The speedo head will be modified to house 4 gauges.

This shot is of the left "wing". They are staying. I will cut them off where the door opens and attach the pieces cut off onto the inside of the doors.

The right "wing"

The glovebox door will be welded in along with the ashtray. The holes for the radio, clock & HVAC controls will be closed up. The hole in the top for the speaker will be closed up. I will create speaker mounts in each end of the top of the dash. One of the things I really like about this particular dash other than appearance is the defroster vent. It is all along the windshield. The trim piece that goes at the base of the windshield hides it letting air escape at the base of the windshield. I am also planning a long thin slit added to the bottom of the dash that will be utilized for HVAC vent instead of traditional louvers.
elgemcdlf- Posts : 49
Join date : 2011-11-05
Re: 1970 F100 SWB
![]() elgemcdlf April 3rd 2012, 7:06 am
elgemcdlf April 3rd 2012, 7:06 am


Truck's new hat?

Spare parts?


elgemcdlf- Posts : 49
Join date : 2011-11-05
Re: 1970 F100 SWB
![]() elgemcdlf April 3rd 2012, 7:08 am
elgemcdlf April 3rd 2012, 7:08 am
Picked up my oil pan with everything required. Forward progress once again.
For now I am just a happy little camper having a pan that I can use. I am pushing the engine as far back as I can & as low as I can. The desired effect is better handling.
elgemcdlf- Posts : 49
Join date : 2011-11-05
Re: 1970 F100 SWB
![]() elgemcdlf April 3rd 2012, 7:08 am
elgemcdlf April 3rd 2012, 7:08 am

elgemcdlf- Posts : 49
Join date : 2011-11-05
Re: 1970 F100 SWB
![]() elgemcdlf April 3rd 2012, 7:09 am
elgemcdlf April 3rd 2012, 7:09 am


elgemcdlf- Posts : 49
Join date : 2011-11-05
Page 1 of 2 • 1, 2 ![]()
» Which Alum Cylinder head?
» ??? on installing 429 in '69 F100
» 63 F100
» My 57' F100 Motor, what ya think?
|
|
|