25.1E ------- 64 Fairlane
+45
nitrous.f
Goldylox_fairlane
Bill Heard
wickettoby1
litshoot
rbro460
Mark Miller
738drvr
774 Super Street
drksyde64
DILLIGASDAVE
jasonf
ssurles268
pmrphil
rmcomprandy
D. Sea
Doug Rahn
514Fox87
Tomasw
Lem Evans
TravisRice
maverick532
Wayne Pearce
slurm
BBFTorino
res0rli9
69F100
AZFairlane
Race Ready Fabrications
larry552
BigBlockFalcon
Scott Foxwell
gmsmkr
7.5L1985GT
Mustang-junky
514F-1
stanger68
whitefield
bruno
cool40
jeffgfg
FalconEh
68formalGT
Mike R
QKiss
49 posters
Page 4 of 13
Page 4 of 13 •  1, 2, 3, 4, 5 ... 11, 12, 13
 Re: 25.1E ------- 64 Fairlane
514Fox87 wrote:Wow your tin work scares the crap out of me knowing whats ahead for my project. Thanks a bunch for the pictures. I'm sure they will help a lot.
Tin work can be very time consuming and can try your patience. If there is anything I may be able help you with don't hesitate to ask.
Your car is coming along great --- looks good
QKiss
Last edited by QKiss on January 1st 2017, 12:16 am; edited 2 times in total (Reason for editing : spelling)
QKiss- Posts : 155
Join date : 2012-08-05
Location : Nor Cal -- Fortuna behind the Redwood curtian
 Re: 25.1E ------- 64 Fairlane

Making a wheel tub pattern out of cardboard from the wheel tub box to transfer the shape to the carbon fiber tubs.
The cardboard is a replica of the wheel tub end cap and is marked off every 4 inches and numbered. Every number around the arch has its measurement documented from the end cap to the quarter panel.

The cardboard is being rolled for the wheel tub main body.

A cardboard wheel tub is duct taped together and the dots on the tubs are from the measurement taken earlier.

The dots connected free hand with a magic marker and cut out.

A sheet metal angle piece is formed with a shrinker/stretcher to the end cap radius and is used to hold the tub shape out towards the quarter panel end of the tub.

Checking and fine tuning the radius.

Pieces of poster board are taped in with masking tape to fine tune the quarter panel fit. Note the sheet metal angle shape holder held in place with clecos.

Better shot of the clecos holding the shape holder in side the tub.

With clecos removed and pattern clamped in side the carbon tubs. The pattern is traced with a silver pencil.

With the pattern removed the silver pencil line shows up very well on the black carbon fiber.
QKiss- Posts : 155
Join date : 2012-08-05
Location : Nor Cal -- Fortuna behind the Redwood curtian
 Re: 25.1E ------- 64 Fairlane

The wheel tubs are installed with machine screws to the scalloped brackets so they can be removable.

Tubs are installed as high in the chassis as possible which required 1/4 window caps to block off the part that sticks up into the window opening.

The tubs are checked for level. It is surprising how just a little out of level can be seen by the eye.

A look through the rear window shows the finished tubs and the center panel patterns being developed.

A look through the 1/4 window at the tubs and center panel that is fastened to the inside of the scalloped brackets and held in place with the same machine screws doing double duty with the wheel tub end caps.
If you spotted the NHRA chassis tag it is a 25.1E tag.
QKiss- Posts : 155
Join date : 2012-08-05
Location : Nor Cal -- Fortuna behind the Redwood curtian
 Re: 25.1E ------- 64 Fairlane
looks amazing, Thank you again for posting . Explaining what you did and when has really helped with my own project.
slurm- Posts : 102
Join date : 2011-09-16
Age : 43
Location : north dakota
 Re: 25.1E ------- 64 Fairlane
Good ----- I'm glad you are getting some value from the post. Makes it all worth doing. 


QKiss- Posts : 155
Join date : 2012-08-05
Location : Nor Cal -- Fortuna behind the Redwood curtian
 Re: 25.1E ------- 64 Fairlane
x2 ! Absolutely great work! This is gona be a beautiful ride!slurm wrote:looks amazing, Thank you again for posting . Explaining what you did and when has really helped with my own project.

cool40- BBF CONTRIBUTOR

- Posts : 7308
Join date : 2009-08-31
Age : 53
Location : on the 1/8 mile dyno
 Re: 25.1E ------- 64 Fairlane

Not wanting to drill holes in the chassis and pop rivet the tin in. Patterns were made up of poster board for scalloped brackets and transferred to .050 4130 sheet.

Pattern transfer/layout to the 4130 sheet. Note the scallop tab lower radius is made by punching properly spaced holes prior to profile cutout.

The tab rails were located parallel with 3 equal length rods drilled and tapped on the ends for machine screws as jig fixtures.

Now the tin will be installed with machine screws and removable. The tin is also going to be anodized.

Some of the tools used to fine tune bracket profile.

Center floor panel. ----- The dual purpose side bracket tabs are also used to secure wheel tub end caps.
QKiss- Posts : 155
Join date : 2012-08-05
Location : Nor Cal -- Fortuna behind the Redwood curtian
 Re: 25.1E ------- 64 Fairlane
Wow! I've been silently following your build and all I can say is your attention to detail and fabrication skills are impeccable. I look forward to each post because that year and model Fairlane is one of my favorites.
 Re: 25.1E ------- 64 Fairlane
Thanks Doug 

QKiss- Posts : 155
Join date : 2012-08-05
Location : Nor Cal -- Fortuna behind the Redwood curtian
 Re: 25.1E ------- 64 Fairlane
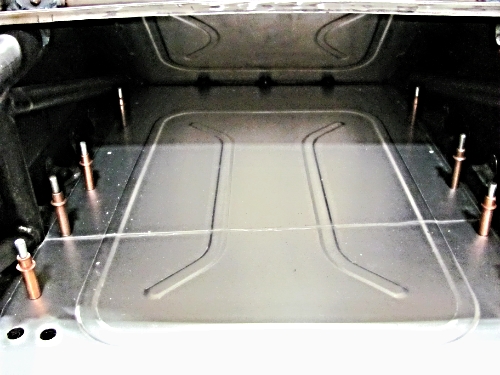
Trunk center floor between the wheel tubs. What looks like a defect line is just a wrinkle in the plastic protective sheet that will be pealed off when finished.
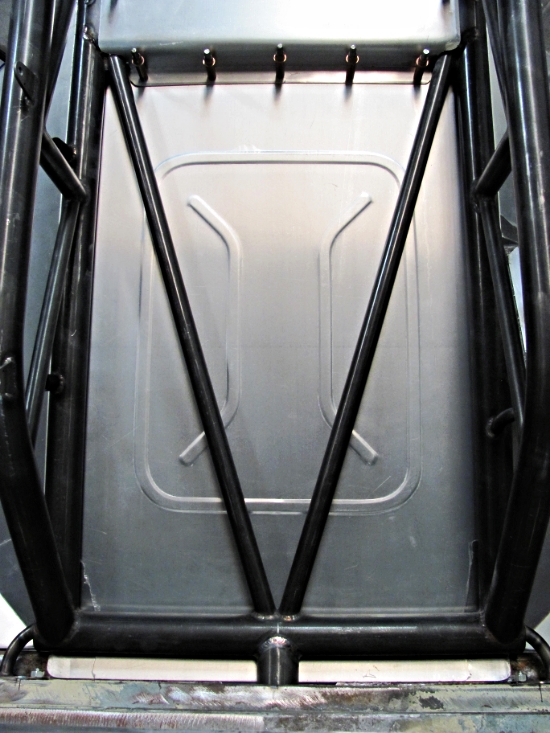
The next center floor panel going back to the rear valence drops down under the frame rails.

Panel transition from top to bottom of the frame rails.

Drivers side wheel tub trunk panel.
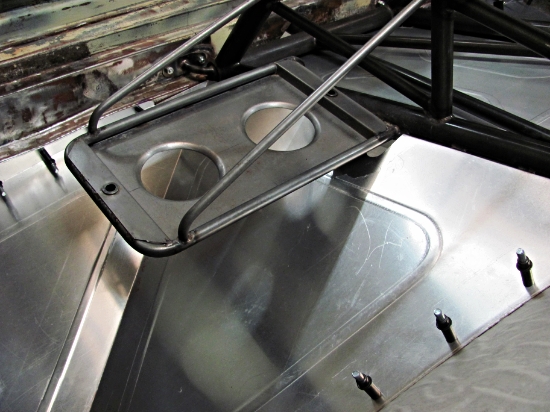
Pass side trunk panel sneaking under the battery tray.

Package tray area fillers.

Wheel tubs and rear tin.

Another rear tin shot.
QKiss- Posts : 155
Join date : 2012-08-05
Location : Nor Cal -- Fortuna behind the Redwood curtian
 Re: 25.1E ------- 64 Fairlane
Damn - you do great work, I wish I could afford your services - that way I wouldn't have to hide my tin work with carpeting!
Wayne (SAWDOFF) Pearce
Wayne (SAWDOFF) Pearce
Wayne Pearce- Posts : 658
Join date : 2009-08-19
Age : 80
Location : Greenfield Center, New York
 Re: 25.1E ------- 64 Fairlane
Thanks Wayne. ------ Just keep in mind master metal shaper Gene Winfield's quote ----- Every day's a school day. 
QKiss- Posts : 155
Join date : 2012-08-05
Location : Nor Cal -- Fortuna behind the Redwood curtian
 Re: 25.1E ------- 64 Fairlane
truly an ART !!!
_________________
coming soon x275 build .........
thanks to all my sponsors :
www.OakleyMotorsports.com
www.Induction-Solutions.com
www.bfevansraceparts.com
www.ultimateconverter.com
www.keithfulpmotorsports.com
 Re: 25.1E ------- 64 Fairlane
Thanks Bruno 
QKiss- Posts : 155
Join date : 2012-08-05
Location : Nor Cal -- Fortuna behind the Redwood curtian
 Re: 25.1E ------- 64 Fairlane

Flush mounted 50 amp charge lug -- and -- Master shutoff switch button.

Plug in portion of the charge lug in place.

Inside the trunk area charge lug and mounting bracket for the exterior flush mount.

master shutoff switch and linkage. It is a little hard to see but if you look close there is a 3/16 rod end on the switch lever pointing forward that will be connected to a Morris cable so the driver can turn on or off while strapped in.

Ballast bar just forward of the rear bumper in the trunk area. There are 4 frame sleeves welded in for 1/2" bolts allowing for 2 ballast bars if needed.
QKiss- Posts : 155
Join date : 2012-08-05
Location : Nor Cal -- Fortuna behind the Redwood curtian
 Re: 25.1E ------- 64 Fairlane

Looking at the way the deck lid drops down between the tail lights meant the wing would need to be mounted to it and to access the trunk the wing would need to come off with it adding to the hassle of deck lid removal.

A filler panel was made to replace the drop down portion of the deck lid. It was designed to also mount the wing to. The arrow points to the original deck lid parting line. On top is a straight edge showing the crown required to match the deck lid crown.

laying out channels for deck lid mounting. The dzus button spring holes are located and center punched.

The holes are punched rather than drilled. small punch is set up for the spring pop rivet holes and the larger punch set up for the dzus button hole.

The punches have a center dimple that centers on a center punch mark -- squeeze -- and presto a nice clean hole.

A special die was made up to fit inside the channel for dzus punch.

Dzus punch.

One of the little jig fixtures with a 1/8" drop to duplicate deck lid thickness to position deck lid mount channels.
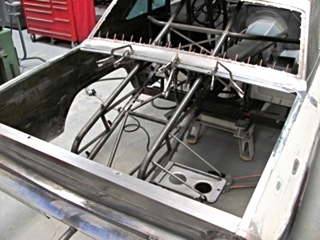
Positioning and spot welding the mount channels to the perimeter of the deck lid opening.


Deck lid finished with the roll over drop removed and fit to its new home.

Now the wing can be added and the deck lid is removable while the wing is left in place.
QKiss- Posts : 155
Join date : 2012-08-05
Location : Nor Cal -- Fortuna behind the Redwood curtian
 Re: 25.1E ------- 64 Fairlane
Nice Project 


D. Sea- Posts : 2768
Join date : 2008-12-02
Age : 55
Location : Kentucky
 Re: 25.1E ------- 64 Fairlane
Qkiss, you never cease to amaze me, not on the old site or even now. I know in my mind that nearly everything you are doing on that 64 will translate over to my 63. Now if I just had the tools and the talent. Keep up the good, no great work.

AZFairlane- BBF CONTRIBUTOR

- Posts : 573
Join date : 2009-02-02
Age : 71
Location : Glendale, AZ
 Re: 25.1E ------- 64 Fairlane
I really like the recessed charging plug......and everything else! But I might borrow the plug idea.

68formalGT- Posts : 865
Join date : 2012-02-13
Location : Pueblo West, Colorado
 Re: 25.1E ------- 64 Fairlane
Thanks fellas for the kind words and I can see AZ you are also infected by the Faiflane bug and I'm not sure there is a cure for it??? 


QKiss- Posts : 155
Join date : 2012-08-05
Location : Nor Cal -- Fortuna behind the Redwood curtian
 Re: 25.1E ------- 64 Fairlane

Making up body mount brackets for the lower end of the wing strut tubes.

These 1/4" left and right thread turn buckles are for length adjustments on the wing strut tubes for wing adjustment.

All the wing strut hardware for rear wing supports. Note weld jig spider with adjustable weight for holding tabs in place for tack welding. The first photo at the top shows spider head more clearly.

Rear wing main body set up to install support hardware.
QKiss- Posts : 155
Join date : 2012-08-05
Location : Nor Cal -- Fortuna behind the Redwood curtian
 Re: 25.1E ------- 64 Fairlane

Poster board is used to design and simulate wing ends and spill plates that are used for layout patterns when design is finalized.
Note; Straight edge at the bottom of pattern running forward on the 1/4 panel aligned with a body line center establishing end plate angle and length.

From poster board to aluminum.

Nice tight fit to body.


It is a little hard to see but there are 4 wing support rods installed.

Here is a outboard support rod with a shortie to the corner of the wing end.
This is also a good shot of the scalloped machine screw tabs for the bolt on gurney lips of various heights.

This shows the relationship of the cut off deck lid -- The filler panel -- and wing mounting so deck lid can be removed without disturbing the wing.
The goal for this wing build was to have its lines fit the Fairlane body lines that is with some curves and radiuses and not square and boxie.
I like the way it turned out ----- I think I'll keep it HA HA
QKiss- Posts : 155
Join date : 2012-08-05
Location : Nor Cal -- Fortuna behind the Redwood curtian

D. Sea- Posts : 2768
Join date : 2008-12-02
Age : 55
Location : Kentucky
 Re: 25.1E ------- 64 Fairlane
Thanks Damon 
QKiss- Posts : 155
Join date : 2012-08-05
Location : Nor Cal -- Fortuna behind the Redwood curtian
 Re: 25.1E ------- 64 Fairlane

The front fenders are pinched in 4 inches. With the front fiberglass bumper having an extra 4 inches of width to play with it was an easy task to put an arc in it.

With a length of small hardware store chain the arc was laid out and the former board cut.

Little relief cuts made every 4 inches and drywall screwed to the former board then glassed back together.
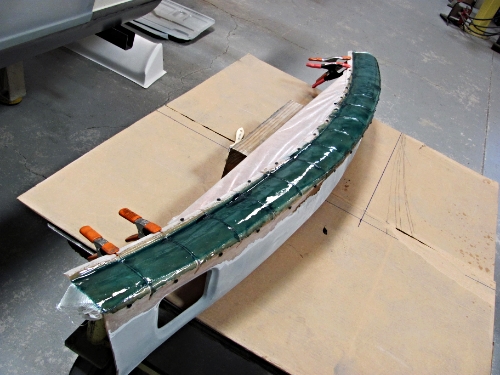
Now it has a more aerodynamic modern look.

Now with the bumper arced forward it pulls the grill out at the bottom and back at the top the solid aluminum grill is more air friendly than the stock barn door shape.
QKiss- Posts : 155
Join date : 2012-08-05
Location : Nor Cal -- Fortuna behind the Redwood curtian
Page 4 of 13 •  1, 2, 3, 4, 5 ... 11, 12, 13
 Similar topics
» 64 Fairlane Strut Front Suspension Conversion Its Done! JIT for the bash!
» Looking for 64 Fairlane
» 1967 fairlane wagon tire ?
» 460 crate engine
» What Are 289 Hipo Heads Worth
» Looking for 64 Fairlane
» 1967 fairlane wagon tire ?
» 460 crate engine
» What Are 289 Hipo Heads Worth
Page 4 of 13
Permissions in this forum:
You cannot reply to topics in this forum|
|
|
