2012 Mustang 25.1 chassis build
+14
QtrWarrior
jbozzelle
TTrotter
dfree383
TravisRice
DILLIGASDAVE
psfracer
stanger68
BBFTorino
Mark Miller
Mike R
samiam
lance flake
460bronco
18 posters
Page 1 of 3
Page 1 of 3 • 1, 2, 3 
 2012 Mustang 25.1 chassis build
Hey Guys- I've been meaning to start posting this build for some time now. The way this whole build came about is a loooong story! But that's what is cool about these types of things. About 2 years ago, I decided that I was going to make the switch from mud racing over to the drag strip. I rolled my 1978 bronco up on its side at a mud race and my wife said if i'm going to keep racing, then it must be in the safest environment possible.
The search was on, I needed a car. I really like the fox body mustangs, but also like the newer stuff as well. I used to work in a few body shops and figured I would look into a wrecked car that the roof and quarter panels were salvageable. This seemed like a great idea until I decided that I wanted the car to have a clean title. So, I started searching the web and ran up on this nice 2012 V6 mustang in atlanta that only had 87,000 miles!
A side note--- I also have 2 falcons (1961 and 1962). The 62' is a 4 door and is a driver while the 61' is basically a parts car. Future plan is to graft the v6-6speed from the mustang to one of these cars. So, the mustang looks like it will work out! I can use a lot of the parts to build-up one of my falcons.
Anyways, here is the mustang the day I brought it home. This is mid november 2017.

Last edited by 460bronco on December 5th 2018, 4:05 pm; edited 1 time in total

460bronco- Posts : 364
Join date : 2010-04-07
Age : 39
Location : Meridian, Ms
 Re: 2012 Mustang 25.1 chassis build
I looked at several chassis kits and ended up settling on the Chassis engineering Eliminator XTR chromoly chassis kit. This kit was cool because they have a spec sheet that you fill out and they will custom bend the important bars that need to be fitted to the contour of the body like the main hoop and upper door /window /A pillar bars.
The first step to get this whole process started was to cut the roof and quarters completely off the car and get them set-up on a chassis jig! I didn't have a chassis jig, but after doing some reading came up with a design....

Extra care was taken fitting these beams. I squared one corner and made an L with the first long side and a short side to make a corner that was perfectly flat and square. AFter tacking this together the second L was fabricated on top of this one. Then the two L shaped pieces were squared to each other and finish welded. Quite a project!!! One cool feature that I incorporated was a boat trailer jack on the front and I put 2 steel casters inside the rear legs. This makes the table easily movable. Once in place, lower the front jack and screw down the leveling pins to get the table level front to back and side to side.
The first step to get this whole process started was to cut the roof and quarters completely off the car and get them set-up on a chassis jig! I didn't have a chassis jig, but after doing some reading came up with a design....


Extra care was taken fitting these beams. I squared one corner and made an L with the first long side and a short side to make a corner that was perfectly flat and square. AFter tacking this together the second L was fabricated on top of this one. Then the two L shaped pieces were squared to each other and finish welded. Quite a project!!! One cool feature that I incorporated was a boat trailer jack on the front and I put 2 steel casters inside the rear legs. This makes the table easily movable. Once in place, lower the front jack and screw down the leveling pins to get the table level front to back and side to side.

460bronco- Posts : 364
Join date : 2010-04-07
Age : 39
Location : Meridian, Ms
 Re: 2012 Mustang 25.1 chassis build
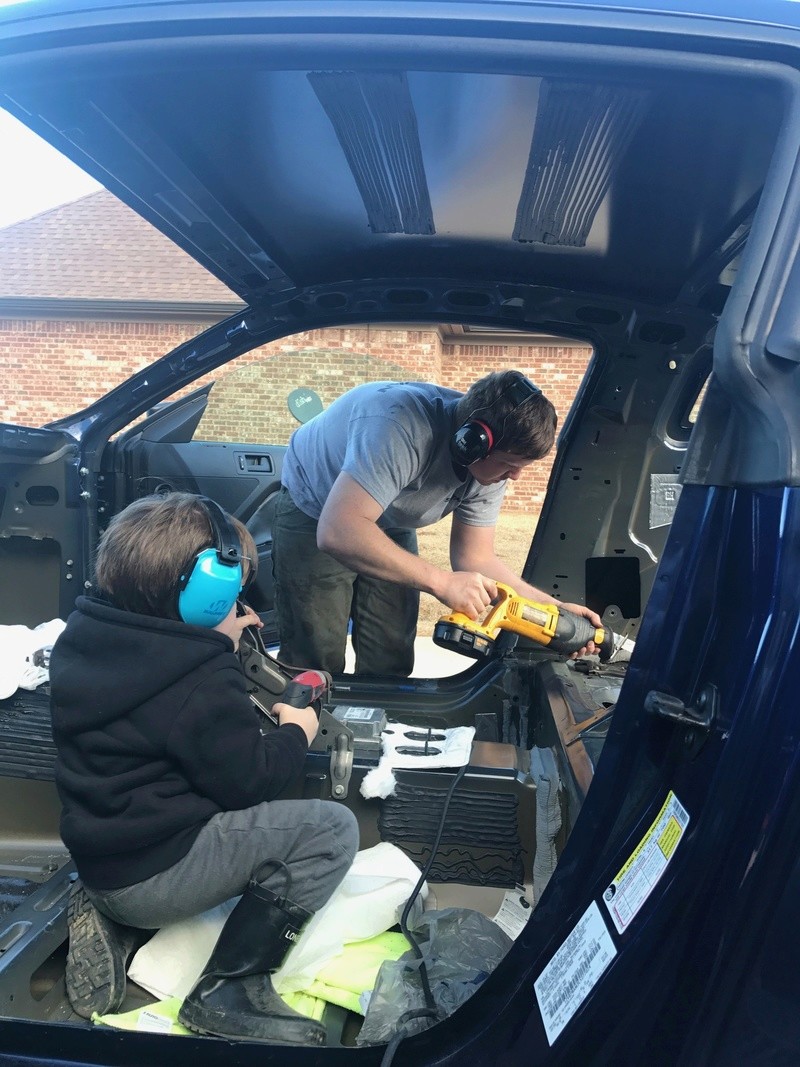
Here are a few pics of the body removal process. In the first pic, you can see I have my crew chief directing the show. He's almost 4 years old now and enjoys helping daddy.

After some time with the sawzall and some cutoff wheels etc, the body is free! I now have a rolling 2012 mustang chassis if anybody is interested!!!

Here is a pic of us initially setting the body up on the jig. The body was still relatively heavy? I'm not sure exactly what the shell weighs, but once on the jig, I cut over 200lbs of supporting metal out of the car while stripping the body down to just the outer layer of steel.


After some time with the sawzall and some cutoff wheels etc, the body is free! I now have a rolling 2012 mustang chassis if anybody is interested!!!

Here is a pic of us initially setting the body up on the jig. The body was still relatively heavy? I'm not sure exactly what the shell weighs, but once on the jig, I cut over 200lbs of supporting metal out of the car while stripping the body down to just the outer layer of steel.


460bronco- Posts : 364
Join date : 2010-04-07
Age : 39
Location : Meridian, Ms
 Re: 2012 Mustang 25.1 chassis build
Finally, the car spends its first night in the garage. My wife is totally cool with this as long as I stay on my side and she can still pull her car in! In this pic, the body is just sitting on some 2x4's on the jig.

Here you can see some strings that are pulled on the table. I center punched the table and drilled holes so strings could easily mark the jig centerline. This was also done at other important places like, rear axle centerline and various cross member locations.

The next order of operations was to get the car centered and leveled on the jig at the final ride height. This car will be 4.5" off the ground at the rear cross member right behind the drivers seat and 3.5" at the nose. So, I took some 2x3" tubing and various square tubing to make spacers for the desired ride height.
Rear mounting crossmember consists of a 2x3 rectangle tube and a 1.5" square tube. I then found the halfway point from the nose to this rear crossmember and made another mounting crossmember here. It consists of a 2x3 rectangle tube and 1" square tube.
The front mounting crossmember is not shown in this photo, but will be a 2x3 rectangle tube and a .5" square tube. This setup makes it easy to maintain the rake of the car while on the jig and will give the chassis' main framerails something good to rest on.

One other neat idea that I came up with was how to actually mount the body to the jig. On these mounting crossmembers I took a small piece of angle iron and placed on each side of the pinch weld seam at the bottom of the car. I welded these to the table while the body was exactly where I wanted it and drilled a hole through the angle and car body so that a removable bolt could fasten the body to the jig. This makes the body easily removable and makes getting it back square and centered super easy. I can get another pic of this if anybody is interested, but its pretty straight forward.

Here you can see some strings that are pulled on the table. I center punched the table and drilled holes so strings could easily mark the jig centerline. This was also done at other important places like, rear axle centerline and various cross member locations.

The next order of operations was to get the car centered and leveled on the jig at the final ride height. This car will be 4.5" off the ground at the rear cross member right behind the drivers seat and 3.5" at the nose. So, I took some 2x3" tubing and various square tubing to make spacers for the desired ride height.
Rear mounting crossmember consists of a 2x3 rectangle tube and a 1.5" square tube. I then found the halfway point from the nose to this rear crossmember and made another mounting crossmember here. It consists of a 2x3 rectangle tube and 1" square tube.
The front mounting crossmember is not shown in this photo, but will be a 2x3 rectangle tube and a .5" square tube. This setup makes it easy to maintain the rake of the car while on the jig and will give the chassis' main framerails something good to rest on.

One other neat idea that I came up with was how to actually mount the body to the jig. On these mounting crossmembers I took a small piece of angle iron and placed on each side of the pinch weld seam at the bottom of the car. I welded these to the table while the body was exactly where I wanted it and drilled a hole through the angle and car body so that a removable bolt could fasten the body to the jig. This makes the body easily removable and makes getting it back square and centered super easy. I can get another pic of this if anybody is interested, but its pretty straight forward.

460bronco- Posts : 364
Join date : 2010-04-07
Age : 39
Location : Meridian, Ms

460bronco- Posts : 364
Join date : 2010-04-07
Age : 39
Location : Meridian, Ms
 Re: 2012 Mustang 25.1 chassis build
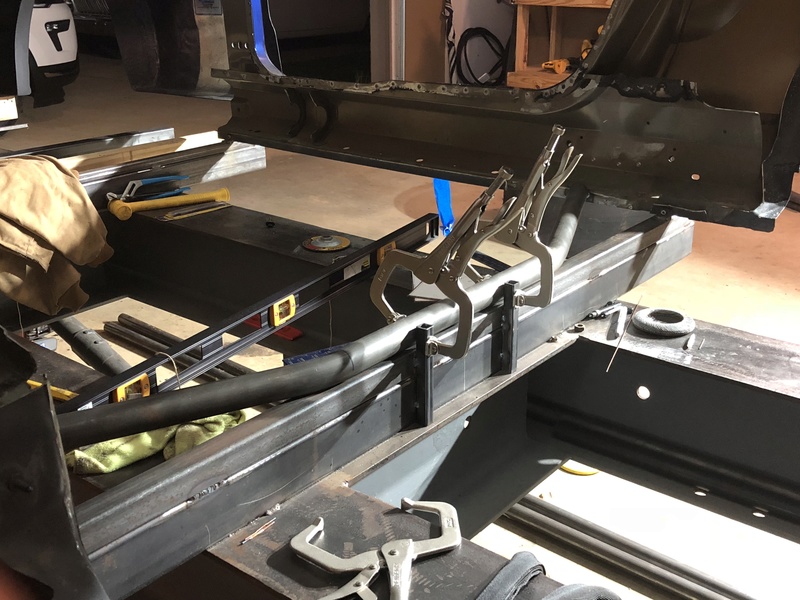
This pic is a pretty big deal. It's the first bar to go in the car! I welded some small square tubing behind the cross member so it could be securely clamped in place.

My boss man came back on the job today. He had to make sure my measurements were in spec.

Here he is again coaching me on tig torch angle.


My boss man came back on the job today. He had to make sure my measurements were in spec.

Here he is again coaching me on tig torch angle.


460bronco- Posts : 364
Join date : 2010-04-07
Age : 39
Location : Meridian, Ms
 Re: 2012 Mustang 25.1 chassis build
Next piece of the puzzle was the rear shock cross member. I had to build a fixture to hold it in the correct position. Ride height, tire size, shock length all came into play when figuring out this height. The fixture was pretty fun to build. It has adjustment for width, height and can even pivot to allow angle changes.


460bronco- Posts : 364
Join date : 2010-04-07
Age : 39
Location : Meridian, Ms

460bronco- Posts : 364
Join date : 2010-04-07
Age : 39
Location : Meridian, Ms
 Re: 2012 Mustang 25.1 chassis build
Here are a few pics of the back half going together. Once the body is mounted to the chassis, I plan on cutting out the entire back portion of the body. The back of the deck lid comes all the way down to the rear bumper, so all of the sheet metal in between is not really needed. Plus is will make mounting parachutes a little easier. Atleast that's the plan at this point.


460bronco- Posts : 364
Join date : 2010-04-07
Age : 39
Location : Meridian, Ms

460bronco- Posts : 364
Join date : 2010-04-07
Age : 39
Location : Meridian, Ms

460bronco- Posts : 364
Join date : 2010-04-07
Age : 39
Location : Meridian, Ms
 Re: 2012 Mustang 25.1 chassis build
Man I can't wait till this thing hits the track! You are making some good progress on this thing.
lance flake- Posts : 142
Join date : 2009-12-28
Location : union ms
 Re: 2012 Mustang 25.1 chassis build
For figuring out the next few bars, I needed to get the motor mocked up in the approximate location. The Stock wheel base on the car is around 108". My fiberglass front is stretched 6", but is easily trimmed back to whatever necessary. I'm thinking about somewhere around 112". That being said, motor is mocked up about 84" in front of the rear axle and crank centerline about 10" off the ground. My little fixture is adjustable in height and width...
Mock-up block is a spare DOVE-A factory 4 bolt block I had back in the shop. Its kind of cool to think about where this block started out and where it is today.

Mock-up block is a spare DOVE-A factory 4 bolt block I had back in the shop. Its kind of cool to think about where this block started out and where it is today.


460bronco- Posts : 364
Join date : 2010-04-07
Age : 39
Location : Meridian, Ms
 Re: 2012 Mustang 25.1 chassis build
lance flake wrote:Man I can't wait till this thing hits the track! You are making some good progress on this thing.
Thanks man! You and me both!!! Its taken quite a while to get where I'm at, but every bar that goes in is one less that has to go in!! One piece at a time as Johnny Cash put it!!!

460bronco- Posts : 364
Join date : 2010-04-07
Age : 39
Location : Meridian, Ms
 Re: 2012 Mustang 25.1 chassis build
AFter a long thought process on what type of seat I wanted for this thing I ended up going with a full containment seat from RaceTech. I went to Tim Mcamis' shop in Mo for some direction on a few things and the guys really raved about these full containment seats vs/ a carbon shell w/ pour-in padding. When it came in the other day, Little Man was pumped and said he was ready to go for a ride!!!


460bronco- Posts : 364
Join date : 2010-04-07
Age : 39
Location : Meridian, Ms
 Re: 2012 Mustang 25.1 chassis build
Lower door bars are in. These were a little tricky because I had to decide on a seat position to insure that the bar crossed my arm between the elbow and shoulder as per the SFI spec.
ONe other little detail... AFter working in the body shop, I wanted to meticulously disassemble the interior body panels of this car and ended up removing over 200lbs of supporting structures. There were hundreds of spotwelds to cut out. Goodness, I'm glad those are behind me.

Here is a pic of the seat mocked up in the chassis.

ONe other little detail... AFter working in the body shop, I wanted to meticulously disassemble the interior body panels of this car and ended up removing over 200lbs of supporting structures. There were hundreds of spotwelds to cut out. Goodness, I'm glad those are behind me.

Here is a pic of the seat mocked up in the chassis.


460bronco- Posts : 364
Join date : 2010-04-07
Age : 39
Location : Meridian, Ms
 Re: 2012 Mustang 25.1 chassis build
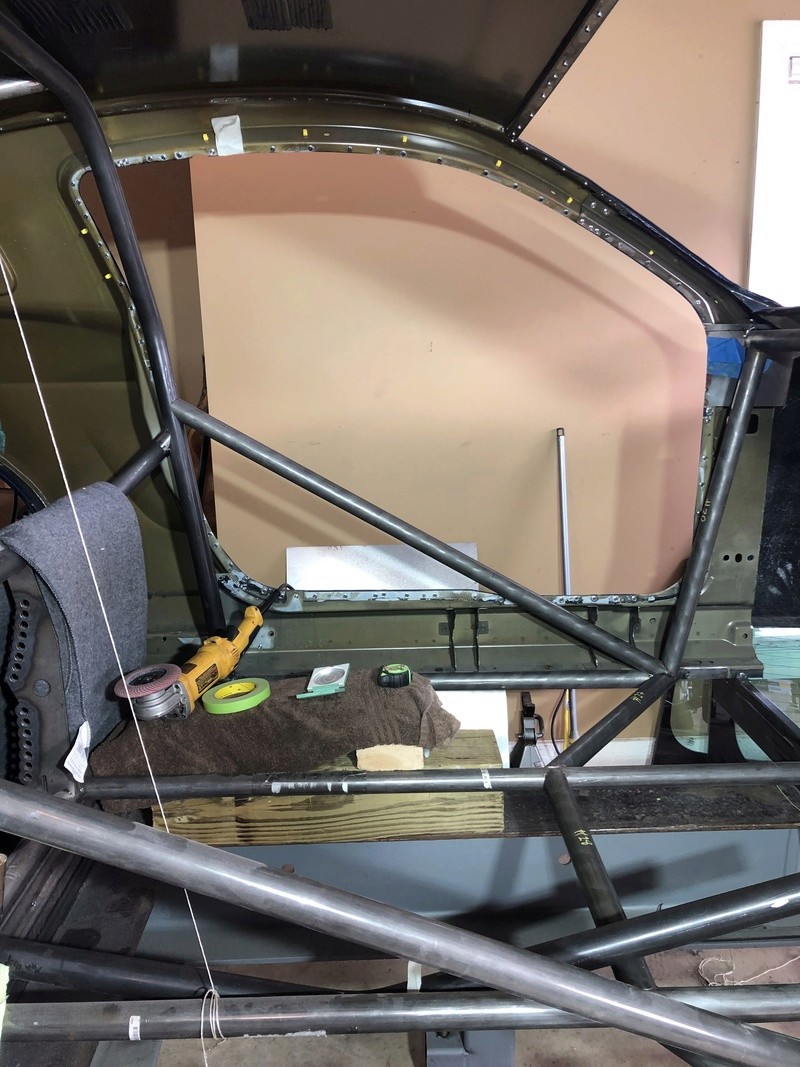
These 2 pics bring us up to date w/ where the project sits today. I've got a few of the funny car cage bars in and next on the agenda are the upper door bars. Hopefully I can get those bent and in over this weekend, then I can work on through the rest of the funny car cage.
Side note- That little bar that goes from the main hoop/door bar connection to the rear seatbelt bar in the funny cage was a booger to fit. I wanted it to be as close to inline with the door bar as possible and level w/ the seatbelt bar. Lots of little grinding and adjustment to get it to fit w/ no gap!!! All of a sudden it just snapped in and fit!


Side note- That little bar that goes from the main hoop/door bar connection to the rear seatbelt bar in the funny cage was a booger to fit. I wanted it to be as close to inline with the door bar as possible and level w/ the seatbelt bar. Lots of little grinding and adjustment to get it to fit w/ no gap!!! All of a sudden it just snapped in and fit!


460bronco- Posts : 364
Join date : 2010-04-07
Age : 39
Location : Meridian, Ms
 Re: 2012 Mustang 25.1 chassis build
very informative build, looks great

samiam- Posts : 240
Join date : 2011-12-20
 Re: 2012 Mustang 25.1 chassis build
Very nice, I really admire your attention to detail.
Mike R- Posts : 1381
Join date : 2009-08-05
Age : 63
Location : St Paul Mn
 Re: 2012 Mustang 25.1 chassis build
Looking good was the chassis kit made for the 2012 Mustang and if not how many bars did you have to bend on your own?Are you going to be doing the welding on your own?And enjoy the time with the little guy they don't stay small for long!!I remember when my nieces and nephew were that age and the next thing you know they're graduating from high school!!! 
Mark Miller- Posts : 1950
Join date : 2009-09-01
 Re: 2012 Mustang 25.1 chassis build
Very cool build!!.....keep the pics and the details coming!! You going to run a twin turbo BB Ford??
Someday when I get rich, I would love to have a chassis car like this, except it would be in 68 Torino fastback flavor!!
Someday when I get rich, I would love to have a chassis car like this, except it would be in 68 Torino fastback flavor!!
BBFTorino- Posts : 998
Join date : 2015-12-31
 Re: 2012 Mustang 25.1 chassis build
Mark Miller wrote:Looking good was the chassis kit made for the 2012 Mustang and if not how many bars did you have to bend on your own?Are you going to be doing the welding on your own?And enjoy the time with the little guy they don't stay small for long!!I remember when my nieces and nephew were that age and the next thing you know they're graduating from high school!!!
Chassis engineering can bend you a kit for any car. They have a spec sheet that you fill out w/ specific angles and measurements inside the shell of the car. Then they fab any bends that are needed. The bars are just made long so that you have plenty of room to fit and notch the way that you would like. Unfortunately I don't really like the fit of the bars that they bent for the window, so I will be bending those myself. A friend and I went in on a tubing bender with a few different dies when we were building roll cages for the mud trucks. Looks like we will be breaking it out again!
And yes sir I will be finish welding this thing myself. I have plans for a rotisserie that will make final positioning much easier.
The time w/ my son on this build has been great so far. He's already talking about a junior dragster and planning how he wants it. He's a sharp kid, but I might be a little partial!!

460bronco- Posts : 364
Join date : 2010-04-07
Age : 39
Location : Meridian, Ms
 Re: 2012 Mustang 25.1 chassis build
BBFTorino wrote:Very cool build!!.....keep the pics and the details coming!! You going to run a twin turbo BB Ford??
Someday when I get rich, I would love to have a chassis car like this, except it would be in 68 Torino fastback flavor!!
I don't think I'm going to go turbo on this build. My dream would be a big inch ford nitrous motor. They have a series down here called the Southern Nitrous racers association that I'd like to get in on some of the action in the future.
For now, I plan on sticking my 523BBF in there to get used to the car before putting big power in there.

460bronco- Posts : 364
Join date : 2010-04-07
Age : 39
Location : Meridian, Ms
 Re: 2012 Mustang 25.1 chassis build
If you don’t mind me asking. How much is a boxed up kit like that? Did it come with the front end and steering components? I e been kicking around the idea of updating mine next year. Versus the cost of just buying a roller and selling mine.
stanger68- Posts : 499
Join date : 2015-12-05
Location : Birmingham, Al
Page 1 of 3 • 1, 2, 3 
 Similar topics
» Mustang II tube chassis build
» My new 528 combo
» Need a Chassis for my new build. GOT ONE!!!
» chassis build or buy
» Chassis build questions
» My new 528 combo
» Need a Chassis for my new build. GOT ONE!!!
» chassis build or buy
» Chassis build questions
Page 1 of 3
Permissions in this forum:
You cannot reply to topics in this forum|
|
|


